User Guide
Editions
Operaio Advanced View Editor (AVE) for System Center Service Manager (SCSM) is available in two editions:
- Operaio Advanced View Editor for System Center Service Manager Free
- Operaio Advanced View Editor for System Center Service Manager Enterprise
There is also a third edition named Pro available. This version is no longer publicly available and is only used for backward compatibility with existing customers.
The following table lists the features available in both versions of the product:
| Feature | Free | Pro | Ent. |
|---|---|---|---|
| Create view (grid view) | x | x | x |
| Create view (web view) | x | x | x |
| Create view (tree view) | x | ||
| Create view (calendar view) | x | ||
| Create folder | x | x | x |
| Unlimited levels of nested folders | x | x | x |
| Define icon for view/folder | x | x | x |
| Set refresh bar interval | x | x | x |
| GUI/XML criteria builder | x | x | x |
| Code Snippet context menu for XML criteria builder | x | x | |
| Column selector | x | x | x |
| Custom columns (SLA, Class Icon, Class Name) | x | x | |
| Set custom headings for columns | x | x | x |
| Set formatting for columns | x | x | x |
| Set exact width or auto-width for columns | x | x | x |
| Sort column as digit | x | x | x |
| Define multi-valued columns | x | x | |
| Change order of columns | x | x | x |
| Set per-user view settings | x | x | |
| Set view categories | x | x | |
| Copy views | x | x | |
| Localization for views and folders | x | x | |
| Load data from multiple type projections | x | x | |
| “My Work Items” View | x | x | |
| Auto-refresh view | x | x | |
| Advertisement in user interface | x |
Installation
How to install Advanced View Editor
The installation is performed using the management pack import functionality of SCSM. Please refer to the Microsoft TechNet Library for more information on how to import management packs:
http://technet.microsoft.com/en-us/library/hh524269.aspx
Follow these steps to install Operaio Advanced View Editor for SCSM:
- For SCSM 2012, import the itnetX.AdvancedViewEditor.2012.mpb management pack For SCSM 2016, import the itnetX.AdvancedViewEditor.2016.mpb management pack
- Restart the SCSM Console
How to upgrade Advanced View Editor
Follow these steps to upgrade Operaio Advanced View Editor:
- For SCSM 2012, import the itnetX.AdvancedViewEditor.2012.mpb management pack For SCSM 2016, import the itnetX.AdvancedViewEditor.2016.mpb management pack
- Restart the SCSM Console
If you are upgrading from a version older than 2.0.1561.79, or when you upgrade from any version of SCSMSolutions Advanced View Editor: - Log on to a SCSM management server as an administrator and execute the PowerShell script Update-AVEViews.ps1
Note on Performance
The script in step 3 will change all references of your existing views from the old version of Advanced View Editor to the new version. Depending on the number of views you created with Advanced View Editor, this process can take a couple of minutes and can have a negative impact on Service Manager’s performance. It is recommended you run this script during non-business hours.
Enabling Enterprise Features
To enable the Enterprise features of Advanced View Editor, you require either a trial or full license. You must install one of these license file types to activate the features of the Enterprise edition. To install the License Management Pack (trial or full license):
- Import the itnetX.SCSM.Licensing.Library.mpb Management Pack into your SCSM environment.
- Import the itnetX.SCSM.ave2Ent.LicenseInfo.mp Management Pack into your SCSM environment.
- Restart the SCSM Console.
My Work Items Views
Operaio Advanced View Editor Enterprise includes the My Work Item Views feature. A management pack with one sample My Work Item View is shipped with Advanced View Editor. You can import the itnetX.AVE.MyWIView.xml management pack and then alter the !My WorkItems view found in the Work Items wunderbar according to your needs.
Please do not import the itnetX.AVE.MyWIView.xml management pack if you are already using My Work Item Views from a previous version of AVE. Your existing views will continue to work after the upgrade process (please refer to the Release Notes).
Folders
Advanced View Editor allows you to create and edit folders to better structure your views in the SCSM console.
How to create a new folder
To create a new folder:
- Open the SCSM console
- Select the folder where you want to create a new sub-folder
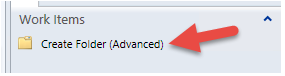
- In the Action pane, select Create Folder (Advanced)
- Fill all required fields
- Press OK to save the folder
How to edit a folder
To change the settings for an existing folder:
- Open the SCSM console
- Select the folder that you want to change
- In the Action pane, select Properties
- Change the desired fields
- Press OK to save the changes
Settings available for Folders
In this section you will find a description of all settings that you can change in Advanced View Editor for Folders.
Name
Name is the display name of the folder. This name will be used everywhere in the console. Max length is 256, but it is better to use shorter names.
Description
This is the description of the folder which is displayed when the mouse cursor hovers over the folder.
Enable Localization
With this option you can define name and description for each language separately.
Image
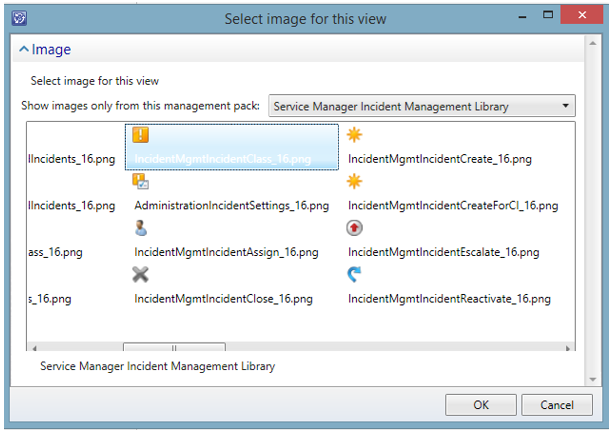
Image is the icon used for the folder. You can select an image from any 16x16 images available in your SCSM. Image selection is only available for new folders.
To select an image:
- Press the Select button
- Select the management pack
- Select the image
- Press OK
Management Pack
You must select a management pack where to store your new view. You can chose an existing one or create a new one.
Grid Views
Grid Views are a replacement of the out-of-the-box view editor with many additional features.
How to create a new view
To create a new grid view:
1. Open the SCSM console
2. Select the folder where you want to create a new grid view
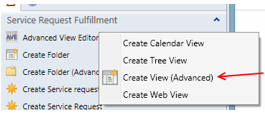
3. In the Action pane, select Advanced View Editor -> Create View (Advanced)
 4. Fill all required fields
5. Press OK to save the view
4. Fill all required fields
5. Press OK to save the view
How to edit a view
To change the settings for an existing view:
- Open the SCSM console
- Select the view that you want to change
- In the Action pane, select Edit View (Advanced)
- Change the desired fields
- Press OK to save the changes
Settings available for Grid Views
In this section you will find a description of all settings that you can change in Advanced View Editor for Grid Views.
Name
Name is the display name of the view. This name will be used everywhere in the console. Max length is 256, but it is better to use shorter names.
Description
This is the description of the view which is displayed when the mouse cursor hovers over the view, or when picking views from lists (like User Role editor).
Enable Localization
With this option you can define name, description and column headings (see below) for each language separately.
Image
Image is the icon used for the view. You can select an image from any 16x16 images available in your SCSM. Image selection is only available for new views and when the target type is already defined. To select an image: 1. Press the Select button 2. Select the management pack 3. Select the image 4. Press OK
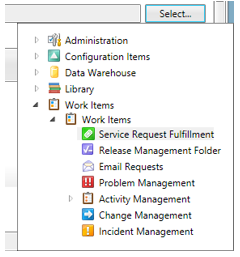
Parent folder
By default, the parent folder is set to the folder where the Create View task was called from, but you can change it here. You can select any folder in any sealed management pack or a folder defined in the same management pack as the view (see below).
To change the folder, press the Select button and select a folder from the tree:
Management Pack
You must select a management pack where to store your new view. You can chose an existing one or create a new one.
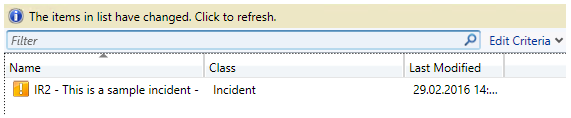
Check new data and display refresh bar
This option allows you to control the out-of-the-box feature of the SCSM View Engine. If enabled, the view engine will query the database using the specified interval and display an information bar on top of the view when new data is available.
Auto-Refresh data
If enabled, the view will be refreshed automatically using the specified interval.
Target class
The target class is used to query data from SCSM. You can select a simple class or a combination class (aka Type Projection).
To select a target class:
- Click the Browse button
- Switch between Frequently used basic classes, All basic classes or Combination classes
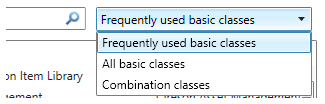
- Select the desired class and press OK
The data in the view will not be refreshed until the information bar is clicked by the user.
View Criteria
You can define the criteria to filter data in the view. Please refer to the Universal Criteria Builder section to read more about the definition of criteria.
Select column to display
In this section you can select columns to use in the view. To select a column just pick it in the list of columns.
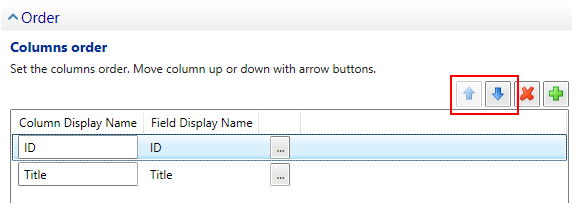
Columns order
In this section you can change the order for the columns and add or remove custom columns.
To change the order:
- Select a column
- Click the up or down button
Custom columns
Custom columns are columns that use logic or rich UI to display data. The list of custom columns can be found in the next chapter.
To add a custom column, press the add button and select the desired column.
Please note: number of available custom column can vary depending on the installed edition of AVE
Columns settings
In the Columns order section you can also define column settings. To define the settings, click the browse button next to the desired column. The number of available settings depend from the type of column.
For all types of columns you can define:
- Display Name
- Width (Auto or exact)
- Hide column
- Sort as digit
- Sort direction and index
- Group direction and index
Sort as digit
By default, all columns are sorted by their value. That can be a problem for ID columns. Image three incidents with IDs ID90, ID802 and ID123. If you sort them then you will expect to see order ID90, ID123, ID802. But in fact you will see ID123, ID802, ID90, because they are sorted as strings. To prevent this, you can use the Sort as Digit option. With this option all IDs will be sorted using number rules.
Sorting and Grouping
Please note: grouping and sorting settings are used only together with Per-User Settings.
Per-User Settings
In the out-of-the-box SCSM View Engine, when a user changes sorting, grouping or hides some columns, the settings are saved in the database. Sometimes you may need to clear those settings, for instance to fix some issues or after you made changes to the column definition. To do that you can use Per-User Settings.
To clear per-user settings:
- Select the users from the list
- Click the Delete button

Also, you can use Per-User Settings to reset settings for all users and set default sorting and group. To do that:
- Define Sorting and Grouping settings using Columns settings
- Create a new group in SCSM with all your users that needs to be reset or have default sorting and grouping (usually, this is a group with all your console users)
- Press the Add personal view settings button

- Select the group from the list
- Press OK to apply settings
Categories
You can pick some categories that can change the behavior of the view: add or remove console tasks, hide view from all users except administrators, etc.
Custom columns
SLA Columns
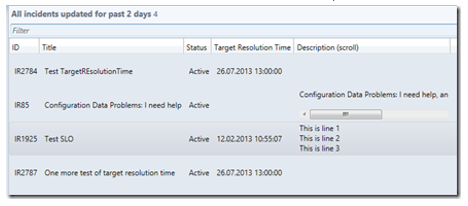
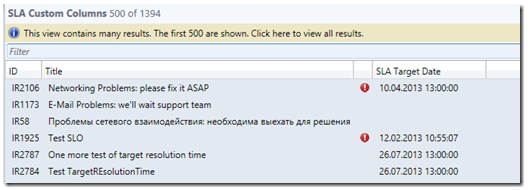
Using AVE you can add custom SLA columns SLA Target Icon and SLA Target End Date to a Grid View. Those columns are built-in columns. The “SLA Target Icon” will display a yellow rectangle for objects in the Service Level Warning state, and a red circle for objects which have Select Level breaches. The “SLA Target End Date” will display the earliest Service Level Target End Date.
To add the custom SLA columns:
- Create a new view based on the combination class “System.WorkItem.Incident.View.SLAProjectionType” if you want to display Incidents or “System.WorkItem.ServiceRequest.View.SLAProjectionType” if you want to display Service Requests. Also you can use any custom combination classes which have a component with alias “SLAInstances”.
- Setup your view as usual.
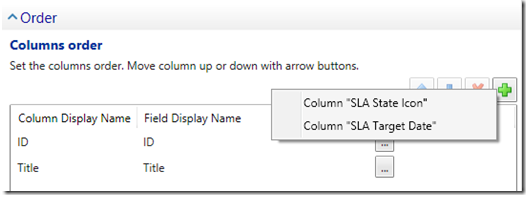
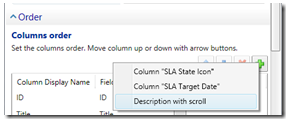
- In the “Order” section, click the
 button and select one of the custom columns: “SLA Target Icon” and “SLA Target End Date”:
- Set the Display Name for the custom column or leave it empty.
- Save the view and check the result:
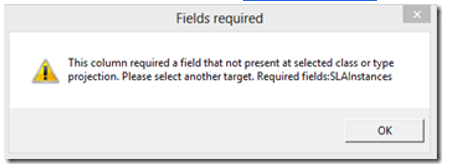
Note: If you have selected the wrong combination class as a target for view, you will see a warning when you try to add a custom SLA columns:
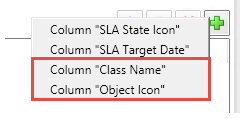
Class Name and Icon
You can add the class name and object icon to a view. This enhances the user experience for long views which display data from different classes (such as My Work Item Views).

To add the custom columns, select the Class Name or Object Icon custom columns.
Universal Criteria Builder
The Universal Criteria Builder allows you to define criteria to filter the data returned by your views. There are two types of criteria builders available in AVE: Criteria Builder and XML Editor.
You can switch between the two editors by in the “Edit View (Advanced)” dialog window.

You will not be able to switch to the Criteria Builder if the XML criteria contains a filter which cannot be rendered by the Criteria Builder.
Criteria Builder
The Criteria Builder is useful for quickly defining simple criteria for your views. It is used just like the out-of-the-box criteria builder from SCSM where you select the class or related class on the top left, then select the properties from the right which you want to apply a filter to, and then press “Add” and set a filter criteria.
The following screenshot shows a filter criteria which returns only Incidents in the status Pending.

XML Editor
Now let’s assume you want to create a criteria which only returns incidents the status of which is not Resolved and not Closed. Using the Criteria Builder, the result will look like this:

The problem with this criteria is the OR operator. We would have to change this to an AND operator for our view to work. However, SCSM does not allow us to change the operator in the Criteria Builder, hence we have to use the XML Editor instead.
If you switch to the XML editor, AVE will aks you if you would like to continue with the criteria you already defined in the Criteria Builder. Click “Yes”, and then change the OR operator and an AND operator.
<QueryCriteria Adapter="omsdk://Adapters/Criteria" xmlns="http://tempuri.org/Criteria.xsd">
  <Criteria>
    <FreeformCriteria>
      <Freeform>
        <Criteria xmlns="http://Microsoft.EnterpriseManagement.Core.Criteria/">
          <Expression>
            <And>
              <Expression>
                <SimpleExpression>
                  <ValueExpressionLeft>
                    <Property>$Context/Property[Type='CustomSystem_WorkItem_Incident_Library!System.WorkItem.Incident']/Status$</Property>
                  </ValueExpressionLeft>
                  <Operator>NotEqual</Operator>
                  <ValueExpressionRight>
                    <Value>{2b8830b6-59f0-f574-9c2a-f4b4682f1681}</Value>
                  </ValueExpressionRight>
                </SimpleExpression>
              </Expression>
              <Expression>
                <SimpleExpression>
                  <ValueExpressionLeft>
                    <Property>$Context/Property[Type='CustomSystem_WorkItem_Incident_Library!System.WorkItem.Incident']/Status$</Property>
                  </ValueExpressionLeft>
                  <Operator>NotEqual</Operator>
                  <ValueExpressionRight>
                    <Value>{bd0ae7c4-3315-2eb3-7933-82dfc482dbaf}</Value>
                  </ValueExpressionRight>
                </SimpleExpression>
              </Expression>
            </And>
          </Expression>
        </Criteria>
      </Freeform>
    </FreeformCriteria>
  </Criteria>
</QueryCriteria>
Please take note that the XML Editor allows you to use the right-click context menu to gain quick access to expressions, properties, tokens, and so on:
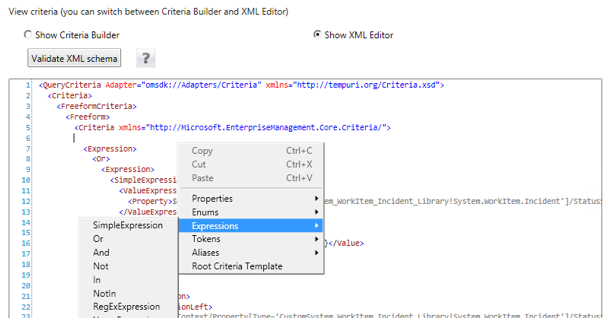
This feature is only available in the Enterprise edition of AVE
How to Copy Views
The “Copy View” feature allows you to copy view located in unsealed management packs. A view can only be copied to the same management pack as the source view.
To copy a view:
- Navigate to view that needs to be copied
- Click the “Copy View” task in Tasks Pane:
- The in-memory copy of the view will be opened
- Change the view settings if necessary
- Click the OK button to save the view
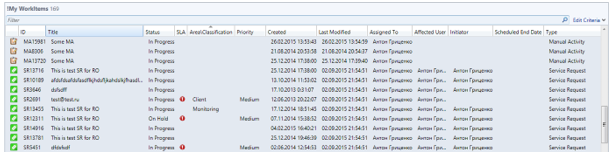
My Work Items Views
My Work Items View is a pre-defined view and is designed to display objects of different types in the same view.
How to create a new view
There is no way to create a new My Work Item View in the UI. You can create new views based on the !My WorkItems sample view directly in the management pack XML code.
Duplicate items in the same view
It is technically possible to create a multi-targeted view which returns one or more items more than once. This is the case if more than one of the underlying type projections return items of the same class(es). Advanced View Editor will display a warning message in the SCSM console when such a view is opened. Such views are not supported and can display wrong data or might miss some data.
How to edit view
To change the settings for an existing My Work Items view:
- Open the SCSM console
- Select the view that you want to change
- In the action pane, select the Edit View task
- Change the required fields
- Press OK to save the view
Settings available for My Work Items View
Name
Name is the display name of the view. This name will be used everywhere in the console. Max length is 256, but it is better to use shorter names.
Description
This is the description of the view which is displayed when the mouse cursor hovers over the view, or when picking views from lists (like User Role editor).
Criteria
With My Work Items View you can define the criteria for each selected combination class separately. To change the criteria:
- Navigate to My WorkItems View
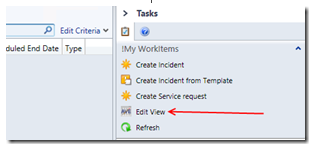
- Click Edit View in Tasks pane:
- Select combination class that you want to change the criteria for:

- Change the criteria with the XML editor.
- Repeat steps 4 and 5 for each combination class
Note: The Criteria Builder is disabled by default because it doesn’t support the
<In>clause and [mygroups] token for criteria.
Per-User Settings
Please refer to the previous Per-User Settings chapter
How to add a custom class to the My Work Items View
By default, there are 5 classes available for My Work Items View:
- Incident
- Service Request
- Manual Activity
- Review Activity
- Change Request
But AVE allows you to add more classes to the view.
- Export the “itnetX 'My Work Items' view Management Pack” from SCSM to any folder.
- Create a backup of the management pack.
- Open the management pack in a text editor of your choice (Notepad++ or Visual Studio strongly recommended)
- Add a new Reference element as a child to
<References>. The new Reference element must point to the management pack with the class definition.
<Reference Alias="System_WorkItem_Problem_Library"> <ID>System.WorkItem.Problem.Library</ID> <Version>7.5.1561.0</Version> <PublicKeyToken>31bf3856ad364e35</PublicKeyToken> </Reference> - Add a new TypeProjection element as a child to
<TypeProjections>. Please only add the components which are really necessary and you will use to filter or display data. For instance, to be able to filter problems by Assigned To field you need the System.WorkItemAssignedToUser relationship as a component. To able to display the affected user, created by user and SLA information you need System.WorkItemAffectedUser, System.WorkItemCreatedByUser and System.WorkItemHasSLAInstanceInformation with System.SLA.Instance.InformationRefersToSLAConfiguration as subcomponent:
<TypeProjection ID="SCSMSolutions.MyWIView.Problem.TypeProjection" Accessibility="Public" Type="System_WorkItem_Problem_Library!System.WorkItem.Problem"> <Component Path="$Target/Path[Relationship='WorkItem!System.WorkItemAssignedToUser']$" Alias="AssignedTo" /> <Component Path="$Target/Path[Relationship='WorkItem!System.WorkItemAffectedUser']$" Alias="AffectedUser" /> <Component Path="$Target/Path[Relationship='WorkItem!System.WorkItemCreatedByUser']$" Alias="CreatedByUser" /> <Component Path="$Target/Path[Relationship='SLALibrary!System.WorkItemHasSLAInstanceInformation' SeedRole='Source' TypeConstraint='SLALibrary!System.SLA.Instance.TimeInformation']$" Alias="SLAInstances"> <Component Path="$Context/Path[Relationship='SLALibrary!System.SLA.Instance.InformationRefersToSLAConfiguration']$" Alias="SLAConfiguration" /> </Component> </TypeProjection> - Optionally, add a new DisplayString element as child to
<LanguagePack ID="ENU" IsDefault="true">\<DisplayStrings>element. Set the ElementID attribute equal to ID of the TypeProjection element created in step 5. The value of the Name subelement will be used in console as the display name of the created type projection:
<DisplayString ElementID="SCSMSolutions.MyWIView.Problem.TypeProjection"> <Name>Problem (Affected User, Assigned To, Initiator)</Name> </DisplayString> - Save the management pack and import it to SCSM.
- Restart the SCSM console.
- Navigate to the My Work Items View. Click “Edit View” console task.
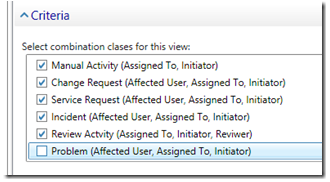
- In the Criteria section, check the new combination classes:
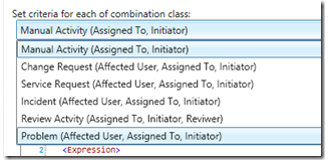
- Select the type projection under “Set criteria for each combination class” combo box:
- Create a criteria for your classs. For instance, to query all problems in status “Active” and assigned to current user or it’s groups use this criteria:
<QueryCriteria xmlns="http://tempuri.org/Criteria.xsd" Adapter="omsdk://Adapters/Criteria"> <Criteria> <FreeformCriteria> <Freeform> <Criteria xmlns="http://Microsoft.EnterpriseManagement.Core.Criteria/"> <Expression> <And> <Expression> <In> <GenericProperty Path="$Context/Path[Relationship='WorkItem!System.WorkItemAssignedToUser']$">Id</GenericProperty> <Values> <Token>[me]</Token> <Token>[mygroups]</Token> </Values> </In> </Expression> <Expression> <In> <Property>$Context/Property[Type='System_WorkItem_Problem_Library!System.WorkItem.Problem']/Status$</Property> <Values> <Value>$MPElement[Name="System_WorkItem_Problem_Library!ProblemStatusEnum.Active"]$</Value> </Values> </In> </Expression> </And> </Expression> </Criteria> </Freeform> </FreeformCriteria> </Criteria> </QueryCriteria> - Click OK to save the view.
- Restart the console.
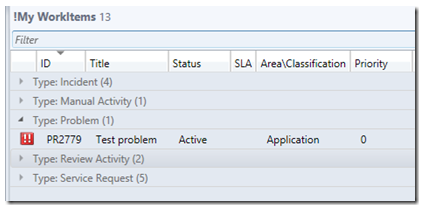
- Check the result:
How to display information from different fields in the same column
When you use the My Work Items View, sooner or later you will find that some fields in incidents, service request or activities have different names but same meaning. The best example of it is Area for Service Request and Classification for Incident.
Another example of the same approach is to display fields with the same name but different types. For instance, if you want to display Priority for all types of work items you will be faced with a problem because Priority on the Incident is integer, but for Service Request priority is an enumeration and you must get it as Priority.DisplayName.
Out-of-the-box the following columns display information from different fields:
- Area\Classification (Area, Classification)
- Scheduled End Date (ScheduledEndDate, TargetResolutionTime)
How it works
If a column is configured to get information from different fields, My Work Items tries to get values from all of the configured fields (for instance from Area and Classification) and checks if the value is empty or not. The first non-empty value will be displayed in the view.
How to add a custom column
To add a column with information from different fields:
- Export the “itnetX 'My Work Items' view Management Pack” from SCSM to any folder.
- Create a backup of the management pack.
- Open the management pack in a text editor of your choice (Notepad++ or Visual Studio strongly recommended)
- Locate the Name="wiCatAreaInfo" substring (around line 258 in original management pack)
- Copy highlighted code and paste it between any two columns where the new column should be displayed:
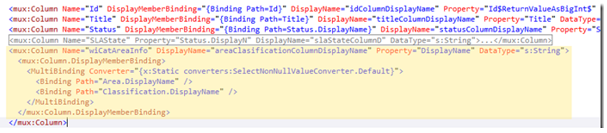
- Change the Name and DisplayName to a unique value. Do not change other attributes (Property and DataType)
- Change the Path attribute in each Binding element to the corresponding field name. For example, if you want to display the Priority in this column you must change it to:
<mux:Column Name="wiPriorityInfo" DisplayName="wiPriorityInfoColumnDisplayName" Property="DisplayName" DataType="s:String"> <mux:Column.DisplayMemberBinding> <MultiBinding Converter="{x:Static converters:SelectNonNullValueConverter.Default}"> <Binding Path="Priority" /> <Binding Path="Priority.DisplayName" /> </MultiBinding> </mux:Column.DisplayMemberBinding> </mux:Column> - Scroll down to
section and add a new ViewString element inside of it with ID equal to the DisplayName attribute of the column (see step 7). Change the Name attribute inside the MPElement to a unique value:
<ViewString ID="wiPriorityInfoColumnDisplayName">$MPElement[Name="StringResource.wiPriorityInfoColumnDisplayName"]$</ViewString> - Scroll down to
<StringResources>section and add a new StringResource element inside of it with ID equal to Name attribute from step 8:
<StringResource ID="StringResource.wiPriorityInfoColumnDisplayName" /> - Create a new DisplayString element in the corresponding LanguagePack section with ElementID attribute equal to ID of the StringResource:
<DisplayString ElementID="StringResource.wiPriorityInfoColumnDisplayName"> <Name>Priority</Name> </DisplayString> - Save and import the management pack to SCSM
- Restart the SCSM console
Result:

Tree Views
Tree View is a custom view type and is designed to display items in a hierarchical tree

How to create a new view
To create a new tree view:
- Open the SCSM console
- Select a folder where you want to create a new tree view under
- In the Action pane select Advanced View Editor -> Create Tree View
- Fill all required fields
- Press OK to save the view
How to edit a view
To change the settings of an existing view:
- Open the SCSM console
- Select the view that you want to change
- In the Action pane select Edit Tree View
- Change the required fields
- Press OK to save the view
Settings available for Tree Views
In this section you will find a description of all settings that you can change in Advanced View Editor for Tree Views.
Name
Name is the display name of the view. This name will be used everywhere in the console. Max length is 256, but it is better to use shorter names.
Description
This is the description of the view which is displayed when the mouse cursor hovers over the view, or when picking views from lists (like User Role editor).
Enable Localization
With this option you can define name, description and column headings (see below) for each language separately.
Image
Image is the icon used for the view. You can select an image from any 16x16 images available in your SCSM. Image selection is only available for new views and when the target type is already defined.
To select an image:
- Press the Select button
- Select the management pack
- Select the image
- Press OK
Parent folder
By default, the parent folder is set to the folder where the Create View task was called from, but you can change it here. You can select any folder in any sealed management pack or a folder defined in the same management pack as the view (see below).
To change the folder, press the Select button and select a folder from the tree:
Management Pack
You must select a management pack where to store your new view. You can chose an existing one or create a new one.
Target class
The target class is used to query data from SCSM. You can select a simple class or a combination class (aka Type Projection).
To select a target class:
- Click the Browse button
- Switch between Frequently used basic classes, All basic classes or Combination classes
- Select the desired class and press OK
Tree configuration
To configure the tree view you have to configure the root node and add at least one child node.
To configure the root node:
- Select the root node in the Tree Config section (the name of the node is equal to name of the target class)
- Click “Config…”
- Define common properties like “Properties To Load”, “Format string” etc. (see below)
- Press OK to save the settings
To add child nodes:
- Select the parent node in the “Tree Config” section
- Click “Add…”
- Check “By target” if you want to select a relationship which has the class of the selected parent node is the target.
- Click “Select Relationship…” to select the relationship used in this node
- Optionally, click “Select Type Constraint…” if you would like to constrain the tree by a specific class type.
- Define common properties like “Properties To Load”, “Format string” etc. (see below)
- Press OK to save the settings
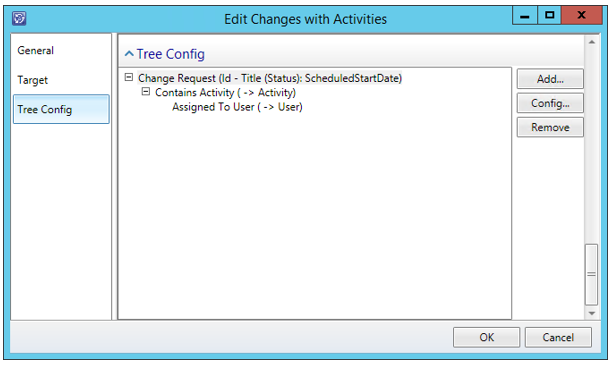
Properties to Load, Format String, and Sort
By default, each tree node will use the Display Name property to show data in the tree view. To change this behavior, you must can use “Properties To Load” and “Format String”.
“Properties To Load” is a list of properties (internal name), one property per line. The order of properties will be used in the “String Format”. You can use C# format options to format values, for instance:
Properties To Load:
Id
Title
Status
ScheduledStartDate
Format String: {0} - {1} ({2}): {3}
Result: CR16 – Upgrade to SQL 2016 (In Progress): 4/18/2016 10:00:00 AM
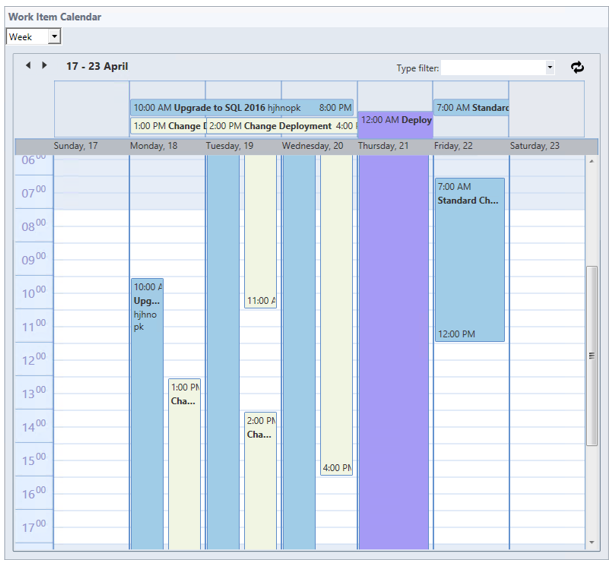
Calendar Views
Calendar View is a custom view type and is designed to display items in an Outlook-like calendar style view.
How to create a new view
To create a new calendar view:
- Open the SCSM console
- Select the folder where you want to create a new grid view
- In the Action pane, select Advanced View Editor -> Create Calendar View
- Fill all required fields
- Press OK to save the view
How to edit a view
To change the settings for an existing view:
- Open the SCSM console
- Select the view that you want to change
- In the Action pane, select Edit Calendar View
- Change the desired fields
- Press OK to save the changes
Settings available for Calendar Views
In this section you will find a description of all settings that you can change in Advanced View Editor for Calendar Views.
Name
Name is the display name of the view. This name will be used everywhere in the console. Max length is 256, but it is better to use shorter names.
Description
This is the description of the view which is displayed when the mouse cursor hovers over the view, or when picking views from lists (like User Role editor).
Enable Localization
With this option you can define name, description and column headings (see below) for each language separately.
Image
Image is the icon used for the view. You can select an image from any 16x16 images available in your SCSM. Image selection is only available for new views and when the target type is already defined.
To select an image:
- Press the Select button
- Select the management pack
- Select the image
- Press OK
Parent folder
By default, the parent folder is set to the folder where the Create View task was called from, but you can change it here. You can select any folder in any sealed management pack or a folder defined in the same management pack as the view (see below).
To change the folder, press the Select button and select a folder from the tree:
Management Pack
You must select a management pack where to store your new view. You can chose an existing one or create a new one.
Target class
The target class is used to query data from SCSM. You can select any abstract or non-abstract class as the base of your Calendar View. All inherited classes will be displayed in the Calendar automatically. For instance, if you select “Work Item” as the target class, it will include Change Requests, Release Records, Manual Activities, and so on.
View Criteria
You can define the criteria to filter data in the view. Please refer to the Universal Criteria Builder section to read more about the definition of criteria.
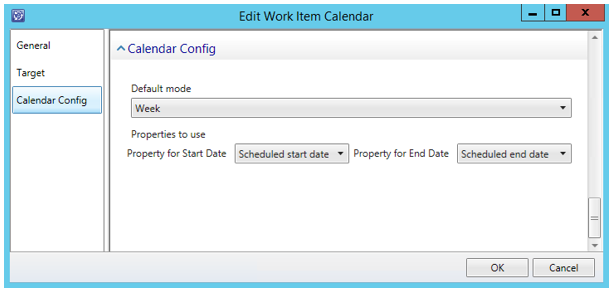
Default mode
In Calendar Views you can display data using a Month view or a Week view. Here you can specify the default view used when loading the Calendar View.
Properties to use
The Start Date and End Date properties are used to define the start and end time of items in the Calendar View. The list of available properties depends on the selected target class.
Web Views
Web View is a custom view type and is designed to display web pages inside of the SCSM console. This can be used to display reports, dashboards, or corporate portals.
How to create a new view
- Open the SCSM console
- Select a folder where you want to create a new web view
- In the Action pane select Advanced View Editor -> Create Web View
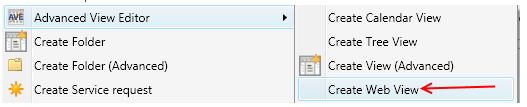
- Fill all required fields
- Press OK to save the view
How to edit view
- Open the SCSM console
- Select the view which you would like to change
- In the Action pane select Edit View
- Change the desired fields
- Press OK to save your changes
Settings available for Web Views
In this section you will find a description of all settings that you can change in Advanced View Editor for Web Views.
Name
Name is the display name of the view. This name will be used everywhere in the console. Max length is 256, but it is better to use shorter names.
Description
This is the description of the view which is displayed when the mouse cursor hovers over the view, or when picking views from lists (like User Role editor).
Enable Localization
With this option you can define name, description and column headings (see below) for each language separately.
URL
URL to load in the view
Image
Image is the icon used for the view. You can select an image from any 16x16 images available in your SCSM. Parent folder
Parent Folder
By default, the parent folder is set to the folder where the Create View task was called from, but you can change it here. You can select any folder in any sealed management pack or a folder defined in the same management pack as the view (see below).
Management Pack
You must select a management pack where to store your new view. You can chose an existing one or create a new one.
Localization
The Advanced View Editor allows you to translate the name and description of the view and folder and heading of each column in the view.
Translate View or Folder name and description
To translate view\folder name and description:
- Open an existing view\folder using the Edit View\Folder or create a new view using Create View console tasks
- Configure all settings for view as usual
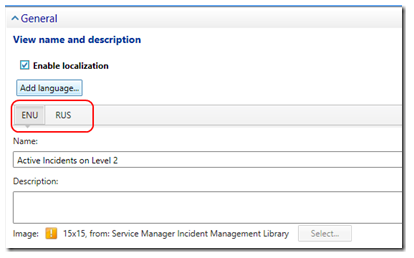
- Click the Enable Localization check box
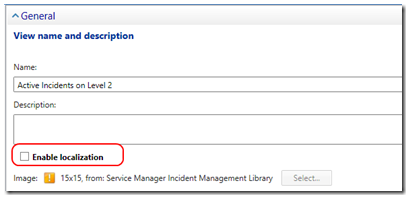
- Switch to the desired language using the tabs and translate the name and description of the view:
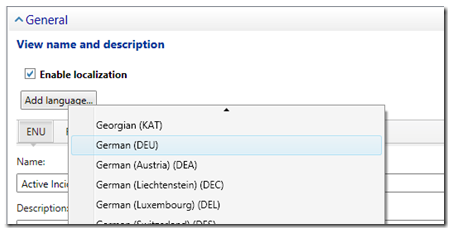
AVE loads all languages available for the current view\folder. In many cases, especially for your custom view\folder, only one language can be loaded. To add a new language:
- Click the Add Language button
- Select the language from menu:
Translate Columns title (Grid View only)
To translate columns in the Grid View, scroll down to the Order section and translate the title for each column:
![]()
Localization Q&A
Q: What if I saved the view or folder with localization enabled but want to edit it again? Do I have to enable localization again?
A: No. You can safely edit your view. The localization will be untouched. If you will change the name, description or column’s title without localization enabled then only the default language will be affected.
Q: What is the default language?
A: Normally, the default language is your SCSM console’s language. The default language is always the first in the list of languages in AVE. For instance, on the screenshots above the ENU (English) is the default language
Advanced Configuration
How to add a custom column template to AVE 2 Grid View
AVE allows you to define custom column templates. This feature is aimed at developers how want to allow end-users to add their custom columns to any SCSM view.
To add a custom column template:
- Create a new management pack
- Add a reference to FreemanRU.SCSMAdvancedViewEditor management pack:
<Reference Alias="AVE"> <ID>FreemanRU.SCSMAdvancedViewEditor</ID> <Version>2.0.1561.43</Version> <PublicKeyToken>07ccc8013f2057aa</PublicKeyToken> </Reference> - Add a new template. Target TypeId is FreemanRU.SCSMAdvancedViewEditor.CustomColumnsConfiguration class. You can use next snippet:
`DescriptionWithScroll <![CDATA[
]]>
4.  Set the Id of the custom column in **ColumnId**. This column must be unique for the given SCSM installation.
5.  Insert the XAML markup for your custom column in the **ColumnTemplate** property. You can use any valid XAML markup, you can add your custom controls, converters and so on. Code below will display first three line of Description field and use scroller if Description is more than three line:
6.  Optionally, add fields required for this custom column in **RequiredFields** property. It can be name of the property or alias or component. You can define many properties using the comma (“,”) separator. The AVE 2 Pro will check if those fields are exist in view’ target class before add custom column to view.
7.  Optionally, set the default Display name for this custom column using **DisplayName** property.
8.  Optionally, add the additional property to load. Bu default, the SCSM view engine loads only property for target class itself and all component with MaxCardinality=1. This means what if you want to use the properties from components with MaxCardinality>1 you must add them to **AdditonalProperties**. Here is example from build-in SLA custom columns:
9. Add DisplayString for created template to LanguagePack section. This display name will be used as name of your custom columns in AVE 2 Pro UI.
12. Check the result. First screenshot with 3 lines in description, second is with 5 lines: