User Guide
Editions
Operaio Billable Time for System Center Service Manager (SCSM) is available in two editions:
- Operaio Billable Time for System Center Service Manager Free
- Operaio Billable Time for System Center Service Manager Pro
The following table lists the features available in both versions of the product:
| Feature | Free | Pro |
|---|---|---|
| Support for Service Requests | x | x |
| Support for Change Requests | x | x |
| Support for Release Records | x | x |
| Support for Problems | x | x |
| Support for Manual Activities | x | x |
| Multiple time entries per analyst and work item | x | |
| Add comments to time entries | x | |
| Mark time entries unbillable | x | |
| Transfer time from Manual Activities to root work item | x | |
| Timer in header of forms | x | |
| Remove/disable timer for any work item types | x | |
| Prevent timer from starting automatically for any work item types | x | |
| Out-of-box reports for the Data Warehouse | x | x |
| Advertisement in user interface | x |
Installation
Prerequisites
Before installing Operaio Billable Time for System Center Service Manager (SCSM), you must have:
- A properly configured SCSM environment (SCSM 2012 SP1 or later)
- The SCSM Data Warehouse connected and fully synchronized (if you want to use reports)
Installation
The below instructions ask you to import management packs into your SCSM environment. Please refer to the Microsoft TechNet Library for more information on how to import management packs:
http://technet.microsoft.com/en-us/library/hh524269.aspx
Follow these steps to install Operaio Billable Time for SCSM:
- Start the SCSM console as an SCSM administrator.
- For SCSM 2012 SP1/R2, import the itnetX.BillableTime.2012.mpb management pack to your SCSM installation. For SCSM 2016, import the itnetX.BillableTime.2016.mpb management pack to your SCSM installation.
- Restart the SCSM Console.
This will install the form controls for billable time. You now have to enable billable time for the work items of your choice. This is done using form customizations and is explained in the following chapter.
Forms
There are two options to add Operaio Billable Time for SCSM to the forms. Option one is to use the sample management packs which are included in Operaio Billable Time for SCSM. This allows you to add the Billable Time control to the following forms:
- Manual Activity Form
- Service Request Form
- Release Record Form
- Change Request Form
- Problem Form
- Incident Form
If you have customized any of the above forms, you will need to add Operaio Billable Time for SCSM to your form customizations manually.
Out-of-the-box form extensions for Billable Time
Follow these steps to install the itnetX Billable Time for SCSM form extensions:
- Open the itnetX.BillableTime.Forms.XX.xml management pack in an XML text editor of your choice (Notepad++, for example) where XX matches the work item you would like to enable Billable Time for.
- Review the options in chapter 3 and make modifications to the form as desired.
- Import the itnetX.BillableTime.Forms.XX.xml management pack to your SCSM installation.
- Restart the SCSM Console.
- Repeat steps 1-4 for all other desired work item types
Sealing the management pack
It is recommended that you seal the forms management pack using your Strong-Name Key File (SNK). If you do not seal the management pack, you will no longer be able to create templates of work items which include the Billable Time control. More information about sealing management packs can be found in the Microsoft TechNet Library at https://technet.microsoft.com/en-us/library/hh495605.aspx
Add Operaio Billable Time to custom form extensions
SCSM allows you to have only one customization per form. If you have already customized one of the forms, then you must add the Operaio Billable Time Control to your customized form by editing the XML. Follow these steps to do so:
- Open the itnetX.BillableTime.Forms.XX.xml management pack where XX matches the work item you would like to enable Billable Time for using a text or XML editor of your choice.
- Find the
<Form…>element that is targeted to the type projection with the same base class as your form. - Copy the entire
<FormStrings>…</FormStrings>section to the corresponding section of your form. Please check that the IncidentManagement alias is targeted to the ServiceManager.IncidentManagement.Library reference in your management pack. Update or add the reference as required. - Copy the inner XML of the
<Customization>…</Customization>section element to the end of the same section in your form’s customization section. - Add the following reference to the
<References>…</References>section:
<Reference Alias="BillableControl"> <ID>Syliance.BillableTime.Assembly</ID> <Version>1.0.0.0</Version> <PublicKeyToken>ba0c09c599f9f764</PublicKeyToken> </Reference> - Save, seal, and re-import your management pack.
Enabling Pro Features
To enable the Pro features of Billable Time, you require either a trial or full license. You must install one of these license file types to activate the features of the Pro edition. To install the License Management Pack (trial or full license):
- Import the itnetX.SCSM.Licensing.Library.mpb Management Pack into your SCSM installation.
- Import the itnetX.SCSM.BillableTimev2.LicenseInfo.mp or itnetX.SCSM.scsmProdPackv1.LicenseInfo.mp Management Pack into your SCSM installation.
- Restart the SCSM Console.
Permissions for Deleting Billable Time Entries
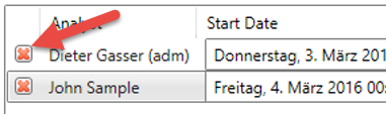
Operaio Billable Time for SCSM allows you to enable your analysts to delete existing time entries. This only applies when you are using the Multiple time entries per work item feature. Users can delete time entries using the red cross button at the beginning of every row.
Deleting a billable time entry requires special permissions in SCSM. In a typical environment, your analysts are assigned to user role profiles such as Incident Resolvers, Service Request Analysts, or Advanced Operators. To enable these user roles to delete billable time entries, you must grant permissions in SCSM.
Please follow these steps to grant the required permissions to a user role profile:
- Copy the Set-SCSMProfileOperation.ps1 and Set-itnetXBillableTimePermissions.ps1 files to your SCSM management server (copy both files to the same folder).
- Open Set-itnetXBillableTimePermissions.ps1 in a text editor of your choice.
- Find the line
$profilename = "AdvancedOperator"and change the value AdvancedOperator to the desired user role profile. Possible values are:
a. EndUser
b. ActivityImplementer
c. AdvancedOperator
d. Author
e. ChangeInitiator
f. ChangeManager
g. IncidentResolver
h. Operator
i. ProblemAnalyst
j. ReadOnlyOperator
k. ReleaseManager
l. ServiceRequestAnalyst - Find the line
$scsmServerName = "localhost"and change the value localhost to the name of your SCSM management server if needed. - Save and close the file.
- Run Set- itnetXBillableTimePermissions.ps1 in PowerShell as an administrator.
Update from previous version
Update sequence To upgrade any previous version:
- Start the SCSM console as an SCSM administrator
- For SCSM 2012, import the itnetX.BillableTime.2012.mpb management pack
For SCSM 2016, import the itnetX.BillableTime.2016.mpb management pack - Restart the SCSM Console.
Configuration
Operaio Billable Time for SCSM is ready to use right after the installation, however you can configure additional options that are described in this chapter.
Multiple time entries per work item
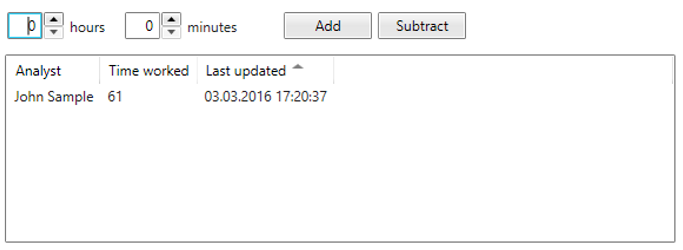
The standard Billable Time control allows you to record the total amount of time spent on a work item per analyst. It looks like this:
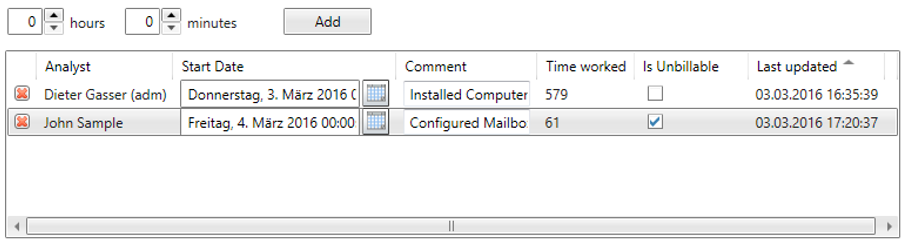
Alternatively, you can enable your analysts to add multiple time entries to a work item. Each time entry can have an individual start date, a comment, and can also be marked unbillable:
The control can be enabled for each work item individually. To enable the multiple time entries control:
- Open the management pack with the form customization
- Find the code:
`
3. Insert the next code snippet right after the code found in step 2:
If this section already exists, change the value from **false** to **true**.
4.  If your form also includes the timer/clock control, then you also have to add the following code after the
<AddControl Parent="..." Assembly="itnetX.SCSM.UIControls.BillableTimeControl, Version=1.0.0.0, Culture=neutral, PublicKeyToken=ba0c09c599f9f764" Type="itnetX.SCSM.UIControls.TimerControl"...code section:
If this section already exists, change the value from false to true.
5. Save, seal, and re-import your management pack.
Restrict analysts to edit their own time entries only
When you are using the multiple time entries per work item option, you can restrict access to own time entries for your analysts. This prevents an analyst from modifying existing time entries from someone else.
To enable this option, set the IsAllowEditOwnRecordsOnly option to true.
<PropertyChange Object="BillableTimeControl_1" Property="IsAllowEditOwnRecordsOnly">
  <NewValue>true</NewValue>
</PropertyChange>
Do not allow existing time entries to be changed
When you are using the multiple time entries per work item option, you can disallow changing existing time entries. Your analysts will then always have to add new time entries. They can add entries with a negative time amount if they need to make corrections.
To enable this option, set the IsAllowEditExistingRecords option to true.
<PropertyChange Object="BillableTimeControl_1" Property="IsAllowEditExistingRecords">
  <NewValue>true</NewValue>
</PropertyChange>
Hide the “Comment” or “Is Unbillable” column
You can hide the “Comment” and/or the “Is Unbillable” column from the billable time control.
To do this, set the HideIsUnbillable or the HideComment option to true.
<PropertyChange Object="BillableTimeControl_1" Property="HideIsUnbillable">
  <NewValue>true</NewValue>
</PropertyChange>
or
<PropertyChange Object="BillableTimeControl_1" Property="HideComment">
  <NewValue>true</NewValue>
</PropertyChange>
Timer Options
The timer is a control in the header of your work item forms which can automatically capture the time the work item was open in your console and create a corresponding billable time entry.

Remove Timer from form
If you want to remove the timer from the form header, please remove the following string in the form extension XML:
<AddControl Parent="gridNewBanner" Assembly="itnetX.SCSM.UIControls.BillableTimeControl, Version=1.0.0.0, Culture=neutral, PublicKeyToken=ba0c09c599f9f764" Type="itnetX.SCSM.UIControls.TimerControl" Left="0" Top="0" Right="0" Bottom="0" Row="0" Column="6" />
Please note that the value for Parent will be different based on the form you are editing.
Also you must remove any subsequent strings that start with:
<PropertyChange Object="TimerControl_1"...</PropertyChange>
Remove Timer from Incident form
The timer on the incident form is an out-of-the-box feature of SCSM. Operaio Billable Time for SCSM allows you to stop and remove the timer on the incident form. To do this, please add the following code segment to your incident form customization:
<!-- Stop timer Control -->
<AddControl Parent="gridNewIncidentBanner" Assembly="itnetX.SCSM.UIControls.BillableTimeControl, Version=1.0.0.0, Culture=neutral, PublicKeyToken=ba0c09c599f9f764" Type="itnetX.SCSM.UIControls.StopClock.StopClockControl" Left="0" Top="0" Right="0" Bottom="0" Row="0" Column="6" />
<!-- Remove timer Control -->
<Delete>
    <Element Name="tgbtnNewBannerStopTimerButton"></Element>
    <Element Name="spNewBannerStopwatchTime"></Element>
</Delete>
Disable Timer for certain statuses
You can disable the timer for given statuses. For instance, you can disable the timer for completed Manual Activities. You edit the IgnorableStatuses property and add/remove IDs of the status(es) to cause disabling the timer. IDs must be separated by semicolon or comma:
<PropertyChange Object="TimerControl_1" Property="IgnorableStatuses">
  <NewValue>
              9de908a1-d8f1-477e-c6a2-62697042b8d9,
              89465302-2a23-d2b6-6906-74f03d9b7b41,
              eaec5899-b13c-d107-3e1a-955da6bf9fa7,
              d544258f-24da-1cf3-c230-b057aaa66bed,
              144bcd52-a710-2778-2a6e-c62e0c8aae74,
              baa948b5-cc6a-57d7-4b56-d2012721b2e5,
              50c667cf-84e5-97f8-f6f8-d8acd99f181c
   </NewValue>
</PropertyChange>
Prevent Timer from starting automatically
To prevent the timer from starting automatically when the form loads, set the AutoStartTimer property to false:
<PropertyChange Object="TimerControl_1" Property="AutoStartTimer">
  <NewValue>false</NewValue>
</PropertyChange>
Prevent Timer on Incident form from starting automatically
The timer on the incident form is an out-of-the-box feature of SCSM. Operaio Billable Time for SCSM allows you to stop the timer on the incident form. To do this, please add the following code segment to your incident form customization:
<!-- Stop timer Control -->
<AddControl Parent="gridNewIncidentBanner" Assembly="itnetX.SCSM.UIControls.BillableTimeControl, Version=1.0.0.0, Culture=neutral, PublicKeyToken=ba0c09c599f9f764" Type="itnetX.SCSM.UIControls.StopClock.StopClockControl" Left="0" Top="0" Right="0" Bottom="0" Row="0" Column="6" />
Transfer time from manual activity to root work item
You can transfer the time logged to manual activities to the time of the root work item. For example, if your analysts add 10 minutes to the billable time of a manual activity which is part of a service request, the 10 minutes will also be added to the billable time of the service request.
- Open the management pack with the form customization
- Find the code:
<PropertyChange Object="TimerControl_1" Property="Margin"> <NewValue>0</NewValue> </PropertyChange> - Insert the next code snippet right after the code you found in step 2
<PropertyChange Object="TimerControl_1" Property="CopyToRoot">
  <NewValue>true</NewValue>
</PropertyChange>
If this section already exists, change the value from false to true. - Find the code:
`
5. Insert the next code snippet right after the code found in step 4:
If this section already exists, change the value from false to true.
7. Save, seal, and re-import your management pack.
Limitation
Due to a limitation of the SCSM form engine, enabling CopyToRoot has one issue: If the manual activity is opened from the root work item form (for instance from the Service Request form’s “Activities” tab), the root form will be saved right after the billable time is added to the manual activity. In this case, the user must re-open the root item form to see the changes to the billable time.
Reports
Before you can use the reports, you have to wait for the following Data Warehouse jobs to complete after importing the management pack:
- MPSyncJob
- Extract_[ManagementGroupName]
- Transform.Common
- Load.Common
This will take a while and can last up to an hour or more, depending on your environment.
Once the reports are deployed, you can find them in the Reporting wunderbar under Syliance Billable Time Reports.
