Installation Guide
Requirements
itnetX ITSM Portal can be deployed in two different ways: installed on a server with the System Center Service Manager management server role or on a separate server. The client requirements are different for these two scenarios.
It is recommended that you install itnetX ITSM Portal on a Service Manager management server. Even for larger deployments where you require to deploy separate server(s) for ITSM Portal, it is recommended to install the Service Manager management server role on the target ITSM Portal servers. This recommendation also applies if you are deploying ITSM Portal to a NLB cluster.
Server Hardware Minimum Requirements
- CPU: 4-core 2.66 GHz CPU
- RAM: 8 GB
- HDD: 100 MB
Server Software Requirements
- OS: Microsoft Windows Server 2008 R2, Microsoft Windows Server 2012, Microsoft Windows Server 2012 R2
- SCSM: Microsoft System Center 2012 Service Manager, Microsoft System Center 2012 SP1 Service Manager, Microsoft System Center 2012 R2 Service Manager
- .NET Framework 4.5
Environment Requirements
When installed on a SCSM management server
- Same Active Directory domain as all SCSM Management Group servers
When installed on a separate server
- Active Directory with forest- and domain-level Windows Server 2003 or above
- All portal servers must be joined to the same domain or in forests with full trust
Client Requirements
When installed on a SCSM management server
- Internet Explorer 9 or above
- Google Chrome 30 or above
- Mozilla Firefox 24 or above
Note: Internet Explorer 9 has some restrictions. Please refer to Release Notes.
When installed on a separate server
- Internet Explorer 9 or above
Other browsers are not supported because configuration with a separate server requires Kerberos authentication.
Note: You can enable Forms Authentication if you need support for other browsers. Please see Enabling Forms Authentication for more information.
Deployment
Please perform the following tasks as an SCSM Administrator to deploy itnetX ITSM Portal:
- For Windows Server 2008 R2, install .NET Framework 4.5
(http://go.microsoft.com/fwlink/?LinkId=225702)
Note: The installation of .NET may require a reboot. Please be aware of that behavior in a production environment. Optional: it is possible to install .NET using command line and the /norestart switch. - For Windows Server 2012 and above, please insert the Windows Server installation media into the DVD drive (or mount the ISO image). The default drive letter in the installation script is D: , therefore you must change the path to the installation media in the installation script if you are not using the D: drive as the media drive letter (please refer to Optional Configuration section).
- If you downloaded the installation media from the Internet then please make sure that your zip file is unblocked. You can check this in the file’s property.
- Unzip the itnetX ITSM Portal installation files to any folder on the target server.
Note: Installation from a network share is not supported - Execute the
runinstaller.cmdfrom an elevated command prompt (Run the Command prompt as an Administrator).
Note: Please refer to Optional Configuration for optional parameters that can be defined in the installation script. - Wait until all prerequisites are installed. After that, the main installer will appear.
- Select a destination for your site.
- Optionally, change the site name in IIS and port.
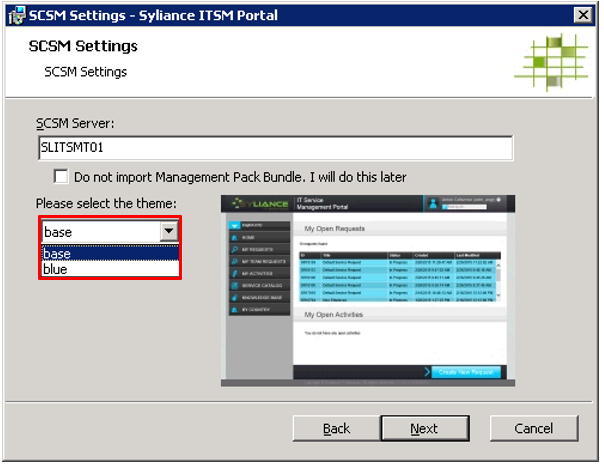
Note: The installer will not check if the port is already in use. If you are installing the portal using a port that is already in use (such as port 80 being used by the Default Web Site), the itnetX ITSM Portal website will not start automatically. In this case, you have to manually stop any sites that use the port and then start the SylianceITSMPortal website using IIS Manager. Alternatively, you can also change the mapping using IIS Manager in order to resolve conflicts. - Enter the SCSM server name that will be used for the connection and select your preferred theme:
- You can skip the management pack import if you do not have administrative permissions to your SCSM.
- Wait until the installation is complete.
- If you skipped the management pack import in step 10, please import the Syliance.ITSMPortal.SupportingObjects.mpb and Syliance.ChecklistActivity.mpb Management Packs from
<PortalFolder>\Docs(where<PortalFolder>is the location of the installed portal) into SCSM.
Note: How to Import a Management Pack:
http://technet.microsoft.com/en-us/library/hh524269.aspxNote: if the site folder already exists, then a backup folder will be created in the site folder using the pattern „__backupyyyyMMdd-DDmmss“, where yyyy is year, MM is month and dd is day, and the entire content of the current site will copied to this folder.
Licensing
For the product to function, you will need to import licensing management packs into your SCSM environment by following these steps:
- Import the Syliance.SCSM.Licensing.Library.mpb Management Pack into your SCSM installation.
- Import the Syliance.SCSM.itsmPortalv2.LicenseInfo.mp Management Pack into your SCSM installation.
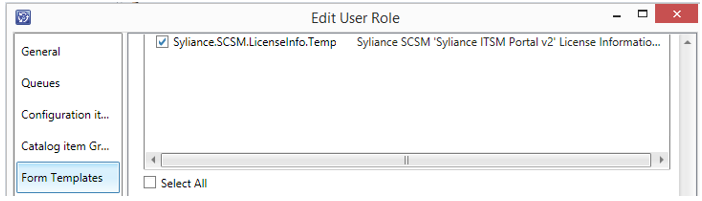
- If you have custom User Roles in SCSM, and those roles are limited by Form Templates, then you must provide access to the template Syliance.SCSM.LicenseInfo.Templates.DataInfo:
Optional Configuration
By default, the installation process installs all necessary features and creates the IIS site and Application Pool.
You can change the behavior of the installation script by changing the following parameters in install-portal.ps1.
| Parameter name | Default value | Description |
|---|---|---|
| $logFile | SylianceITSMPortalInstall.log | Name of the installation log file |
| $win2012SourcePath | D:\sources\sxs | Path to installation media for Windows Server 2012 or above |
Post-installation tasks
Copy Shared Assembly
To complete the installation please copy the file Syliance.ITSMPortal.Shared.dll from the \bin subfolder of the ITSM Portal installation folder to each server where SCSM is installed to the installation folder (c:\Program Files\Microsoft System Center 2012 R2\Service Manager\ by default for System Center 2012 R2).
When installed on a seperate server
If the itnetX ITSM Portal is installed on a separate server and you want to use Single Sign On, additional configuration is required to enable Kerberos Authentication.
Note: These steps are not necessary when the ITSM Portal is installed on a SCSM Management Server!
Note: this configuration will work only for Single Sign On. You will not able to logon from different Kerberos realm (computer not joined to domain or computer from domain that has no cross-forest trust with domain where ITSM Portal installed). You must use Forms Authentication in such scenarios.
To enable Kerberos you must complete the following high level steps:
- Change the Application Pool Identity account
- Change Authentication Provider to Kerberos
- Grant permission to the Application Pool Identity domain account
- Enable delegation for the Application Pool Identity domain account
- Enable delegation for IIS site server and SCSM management server
- Configure SPN records
- Add the ITSM Portal site URL to Local Intranet sites for all your clients
Change the Application Pool Identity account
You can use any domain account for the Application Pool Identity. As a best practice, please use the SCSM Service Account.
To change the Application Pool Identity:
- Open Internet Information Services (IIS) Manager on the IIS site server
- Navigate to Application Pools
- Select SylianceITSMPortalPool
- Click Advanced Settings in the Action pane
- Find the Identity property and click the “…” button
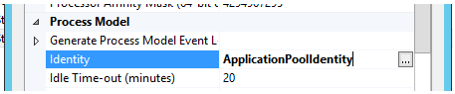
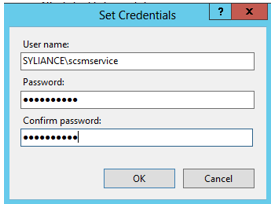
- Select Custom Account and press the Set button to define the domain account:
- Press OK to save the settings
Change Authentication Provider to Kerberos
By default, IIS uses Negotiate and NTLM as authentication providers for Windows Authentication.
To change the Authentication Provider please follow these steps:
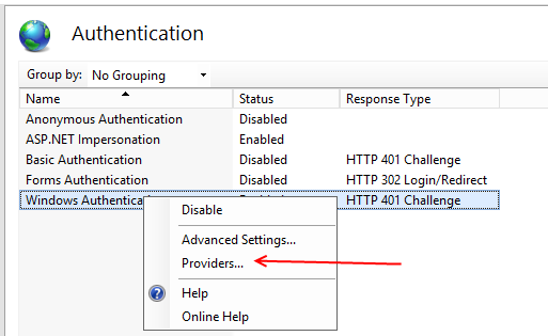
- Open Internet Information Services (IIS) Manager on the site server
- Navigate to Sites
- Select SylianceITSMPortal
- Double-click Authentication
- Right-click Windows Authentication and select Advanced Settings…
- Clear Enable Kernel-mode authentication checkbox
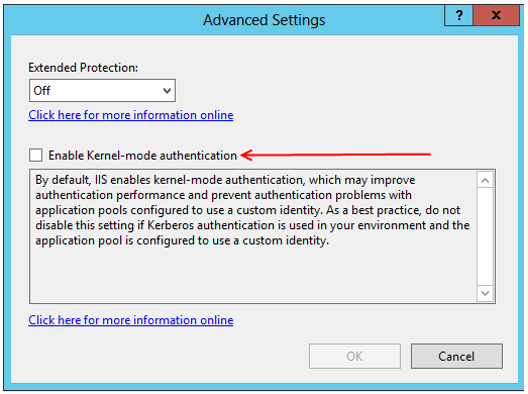
- Press OK to save the settings
- Right-click Windows Authentication and select Providers…
- Select Negotiate and press Remove.
- Select NTLM and press Remove.
- Select Negotiate:Kerberos in the Available Providers and press Add
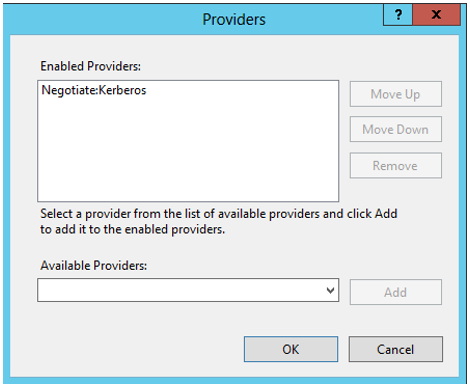
- Press OK to save the settings
Grant permission to Application Pool Identity domain account
The Application Pool Identity domain account requires Impersonate a client after authentication permission. To grant this permission you can add the Application Pool Identity domain account to Administrators group or (preferred) change the policy using gpedit.msc or Active Directory Group Policy.
To grant the permission using gpedit.msc or Active Directory Group Policy:
- Open gpedit.msc locally or Group Policy Editor
- Navigate to Computer Configuration 🡢 Windows Settings 🡢 Security Settings 🡢 Local Policies 🡢 User Rights Assignment
- Find Impersonate a client after authentication and open the properties. Add the Application Pool Identity domain account.
- Press OK to save the settings
- Restart the IIS server
Configure SPN records
To enable Kerberos you must create SPN records for the Application Pool Identity domain account and the SCSM Service Account.
To create SPN records please replace the variables and run the following commands under an account with Domain Administrator permissions:
setspn -S HTTP/%SITESERVER% %DOMAIN%\%AppPoolIdentityAccount%
setspn -S HTTP/%SITESERVER.FQDN% %DOMAIN%\%AppPoolIdentityAccount%
setspn -S MSOMSdkSvc/%SCSMSERVER% %DOMAIN%\%SCSMServiceAccount%
setspn -S MSOMSdkSvc/%SCSMSERVER.FQDN% %DOMAIN%\%SCSMServiceAccount%
where:
| Variable | Description |
|---|---|
| %SITESERVER% | NetBIOS name of the ITSM Portal IIS server |
| %SITESERVER.FQDN% | FQDN name of the ITSM Portal IIS server |
| %SCSMSERVER% | NetBIOS name of the SCSM Management server -or- NetBIOS name of the virtual server for NLB cluster |
| %SCSMSERVER.FQDN% | FQDN name of the SCSM Management server -or- FQDN name of the virtual server for NLB cluster |
| %DOMAIN% | NetBIOS name of your domain |
| %AppPoolIdentityAccount% | User name of Application Pool Identity domain account |
| %SCSMServiceAccount% | User name of SCSM Service account |
Enable delegation for the Application Pool Identity domain account
Follow the steps to enable delegation for the Application Pool Identity domain account:
- Launch Active Directory User and Computers snap-in
- Find the Application Pool Identity domain account and open properties
- Switch to Delegation tab
Note: please run Active Directory Users and Computers snap-in on the domain controller and check the domain level (must be Windows Server 2003 or above) when the Delegation tab is not shown. - Enable Trust this user for delegation to any service (Kerberos only)
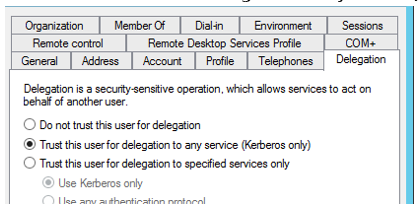
- Save the settings
Enable delegation for IIS server and SCSM managment server
To enable delegation for the IIS server and SCSM Management Server
- Launch the Active Directory User and Computers snap-in
- Find site server computer account and open properties
- Switch to Delegation tab.
Note: please run Active Directory User and Computers snap-in on the domain controller and check the domain level (must be Windows Server 2003 or above) when the Delegation tab is not shown. - Enable to Trust this user for delegation to any service (Kerberos)
- Save settings
- Repeat steps 1 to 5 for the SCSM Management Server computer account
Note: if the itnetX ITSM Portal is targeted to the virtual address of NLB cluster for SCSM Management Servers then you must enable delegation for all servers in the NLB cluster.
Add ITSM Portal site URL to Local Intranet sites for all your clients
To add the URL to the Local Intranet sites for an individual client:
- In Internet Explorer, click Tools 🡢 Internet Options
- Navigate to the Security tab
- Select Local Intranet and press Sites button
- Press Advanced button
- Type the URL of the ITSM Portal site and press Add button
To add the URL to the Local Intranet site using Active Directory Group Policy:
- Open Group Policy Management
- Find the appropriate group policy object and open for edit
- Navigate to User Configuration 🡢 Administrative Templates 🡢 Windows Components 🡢 Internet Explorer 🡢 Internet Control Panel 🡢 Security Page 🡢 Site to Zone Assignment List and open the properties
- Enable the policy
- Press Show button
- Type the URL (FQDN including “http://” or “https://”) of the ITSM Portal site in the Value name column and enter “1” in the Value column

- Save the settings
Validate settings
You can validate settings using a special page. To do this:
- Logon to the portal server locally
- Open Internet Explorer with elevated permissions (Run as Administrator)
- Open the page
http://YOURSERVER/Auth/CheckDelegation, whereYOURSERVERis the portal address. It must be the same as for your end users. - Wait until the page loaded
- Check the results; all lines must be green
Enabling Forms Authentication
For a better user experience, you can enable Forms Authentication on any of the servers where ITSM Portal is installed. Forms Authentication allows you to use ITSM Portal with any browser even if it is installed on a separate server. In addition, Forms Authentication provides a more user-friendly UI for authentication. Please refer to the table below for more details.
| Windows Authentication | Forms Authentication | |
|---|---|---|
| ITSM Portal server must be joined to domain | Yes | Yes |
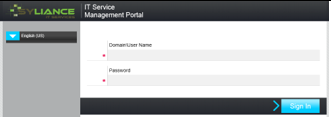
| Logon User Interface | 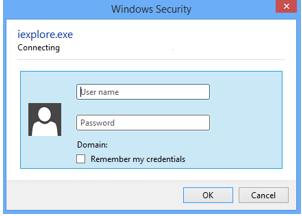 |
 |
| Browsers supported when installed on separate server | IE only | Any |
| Password transferred as clear text | No | Yes |
Note: Because Forms Authentication transmits user name and password as clear text, it is highly recommended to use HTTPS instead of HTTP.
How to enable Forms Authentication
To enable forms authentication:
- Navigate to the ITSM Portal folder, by default
%SYSTEMDRIVE%\inetpub\SylianceITSMPortal\ - Open web.config for editing
- Find the following line
<authentication mode="Windows" /> - Comment this line using
<!--and-->tags:
<!-- <authentication mode="Windows" /> --> - Uncomment the lines (remove
<!--and-->tags) directly below as shown here:
<authentication mode="Forms" > <forms name=".ADAuthCookie" loginUrl="~/Auth/Logon" timeout="15" slidingExpiration="false" protection="All" /> </authentication> - Save changes in web.config
- Open Internet Information Services (IIS) Manager on the site server
- Navigate to Sites
- Select SylianceITSMPortal
- Double-click Authentication
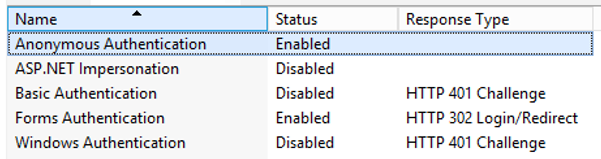
- Disable Windows Authentication and ASP.NET Impersonation, enable Anonymous Authentication.
- Open browser and navigate to ITSM Portal.
How to set default domain
By default, users must enter their user name in DOMAIN\UserName format. But you can set the default domain for all users, in which case the user needs only enter their user name. To set the default domain:
- Navigate to the ITSM Portal folder, by default
%SYSTEMDRIVE%\inetpub\SylianceITSMPortal\ - Open web.config for editing.
- Find the following line:
</appSettings> - Add a new line directly above as shown here:
<add key="defaultDomainForFormAuth" value="DOMAIN" />
where DOMAIN is the NetBIOS name of your domain. - Save changes in web.config
- Open browser and navigate to ITSM Portal.
Hide unnecessary Announcement Tasks
The announcements class has some unnecessary tasks in the SCSM console. Run the fix-SCSMAnnouncementTasks.ps1 from \Doc folder to hide these out-of-box tasks.
Update existing Installations
Note: for the update sequence of an existing installation please refer to the release notes