User Guide
Introduction
itnetX ITSM Portal is an alternative to the System Center 2012/R2 SharePoint-based self-service portal. The itnetX ITSM Portal provides an enhanced experience to the functionality provided by the Microsoft portal.
This document is an end user usage guide for the itnetX ITSM Portal. The guide provides steps on how to navigate the portal and how to perform the supported actions.
Overview of the ITSM Portal
The itnetX ITSM portal is accessed through a supported web browser. The currently supported web browsers are listed in the ITSM Portal Installation Guide.
The first page displayed when you connect to the portal is organized in seven panes.
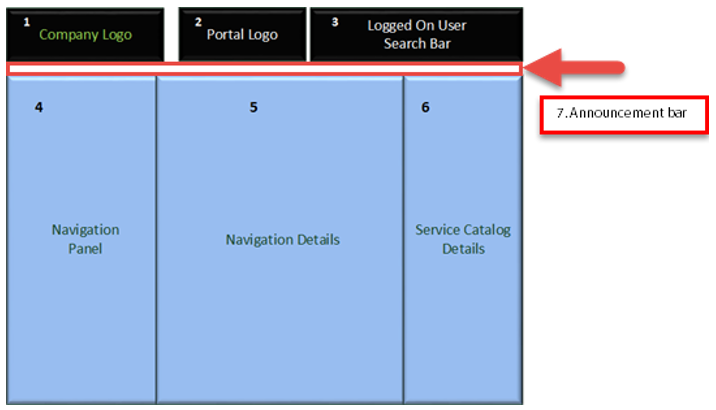
- Company logo and home button pane
- Portal Logo
- Navigation Panel (menu)
- Logged on user and search bar
- Navigation details
- Service catalog details
- Announcement bar
Language Option
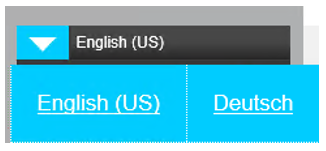
The first menu item is the language selection. Click on the arrow to change the language to an alternative language. Contact your SCSM administrator if your preferred language is not available.
Home
The home page is accessed (which triggers a page initialization) by either clicking the company logo, the portal logo or the home button in the navigation menu.
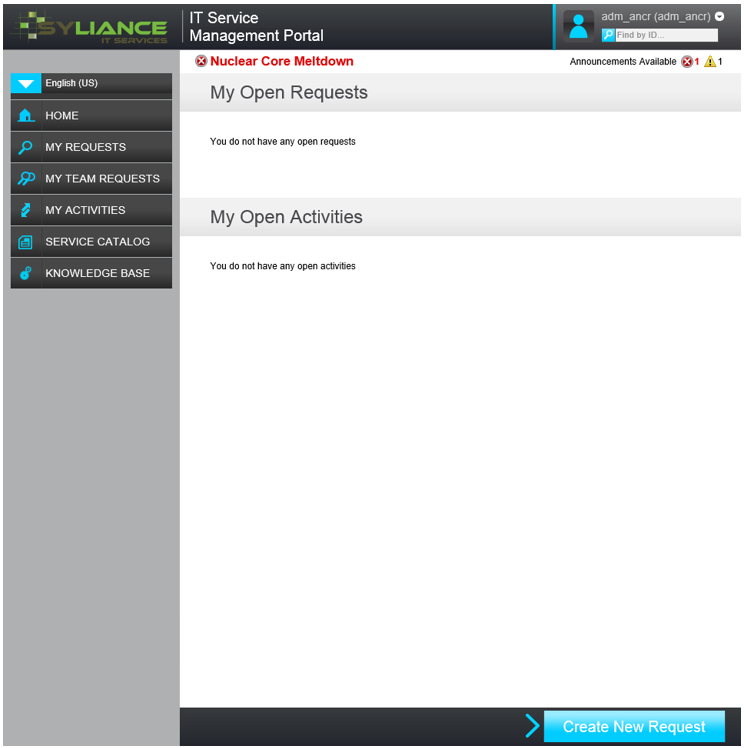
My Requests
The My Requests menu option presents you with all requests assigned to you or raised by you. In the middle pane (Navigation details) you have two filter options:
- Show requests
- Type of request

You can filter by the status of the request:

And by the request type:

Filter the requests using one or both of these options.
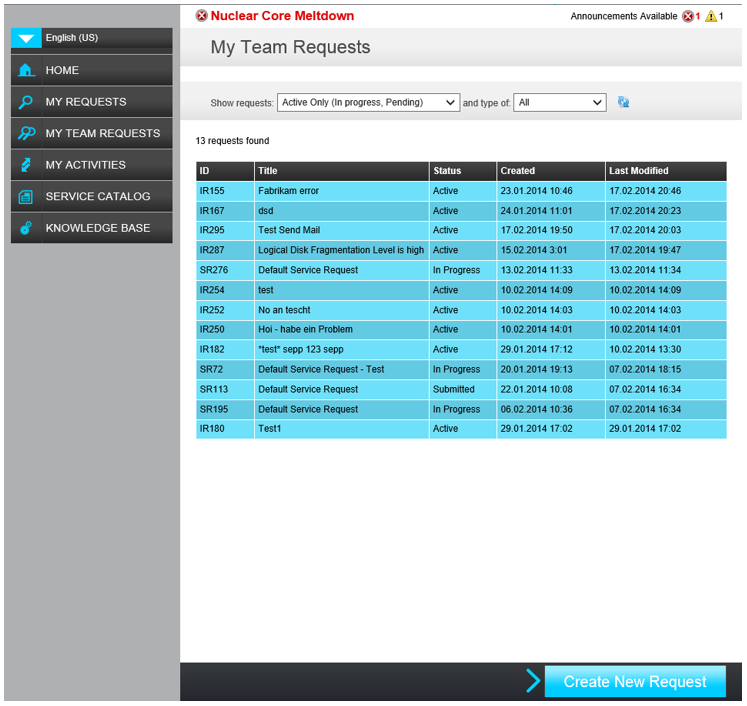
My Team Requests
The My Team Requests menu option presents you with all requests assigned to or raised by your team. You define the Manager Attribute in Active Directory and the AD Connector will populate the Manager field in the Service Manager CMDB automatically.
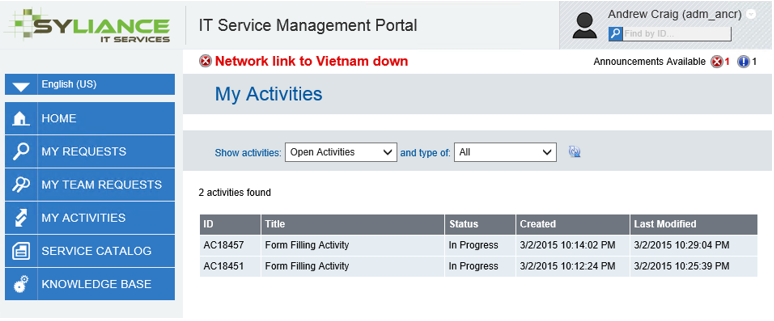
My Activities
The My Activities menu option presents you with all activities assigned to you. In the middle pane (Navigation details) you have two filter options:
- Show requests
- Type of activities
You can filter by the status of the activities:
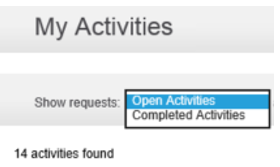
And the activity type:
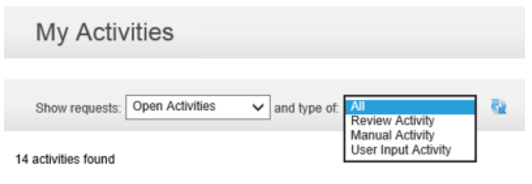
Filter the activities using one or both of these options.
My Team Activities
The My Team Activities menu option presents you with all activities assigned to or raised by your team. You define the Manager Attribute in Active Directory and the AD Connector will populate the Manager field in the Service Manager CMDB automatically.
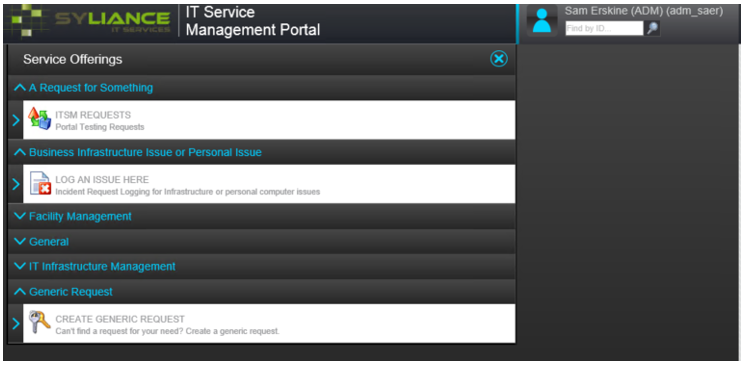
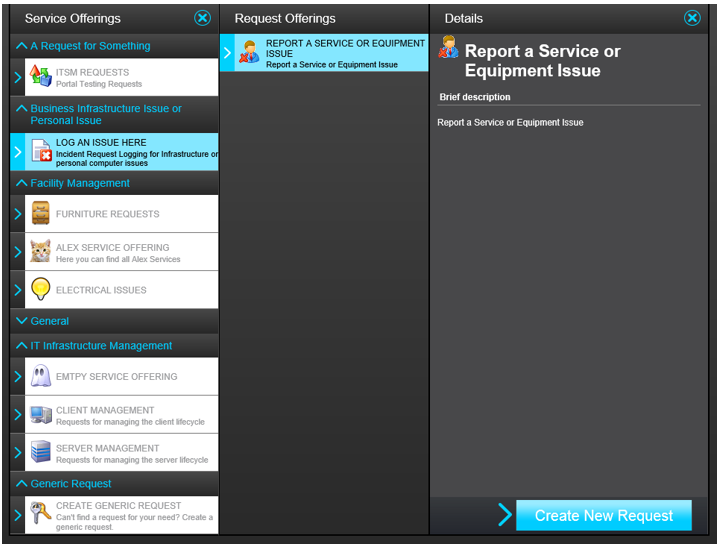
Service Catalog
The Service Catalog menu option presents you with service categories you have been granted access to use. Click on the Service Catalog or Create New Request menu option to get a list of service offerings assigned to your user account.
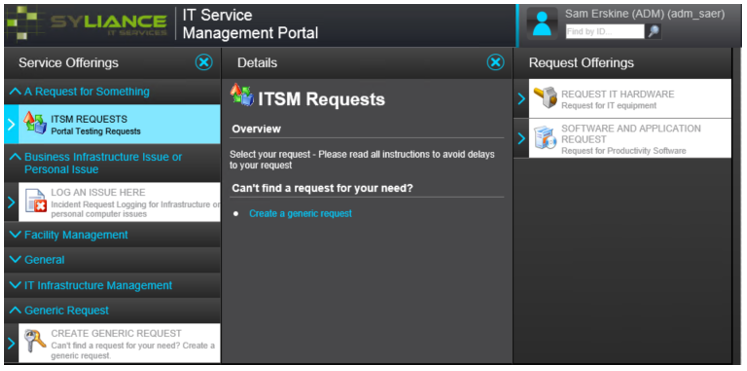
When you click on a Service Offering, you are presented with a Details pane that contains an overview of the service offering (middle pane) and a list of request offerings assigned to this specific category (right-most pane).
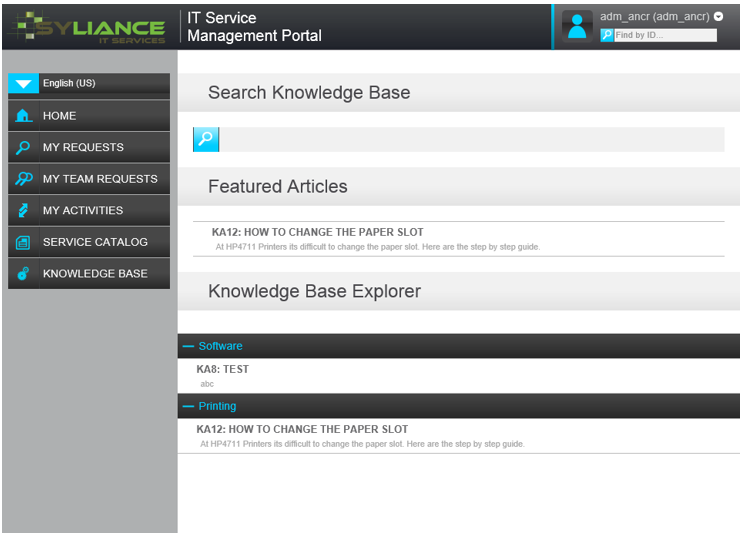
Knowledge Base
The Knowledge Base option provides you with a page where you can search for specific knowledge articles provided by the administrator to help you.
A Knowledgebase Navigator is now included to make it easier to search and browse Knowledgebase articles. A “Featured Article” is displayed between the Search and the Explorer.
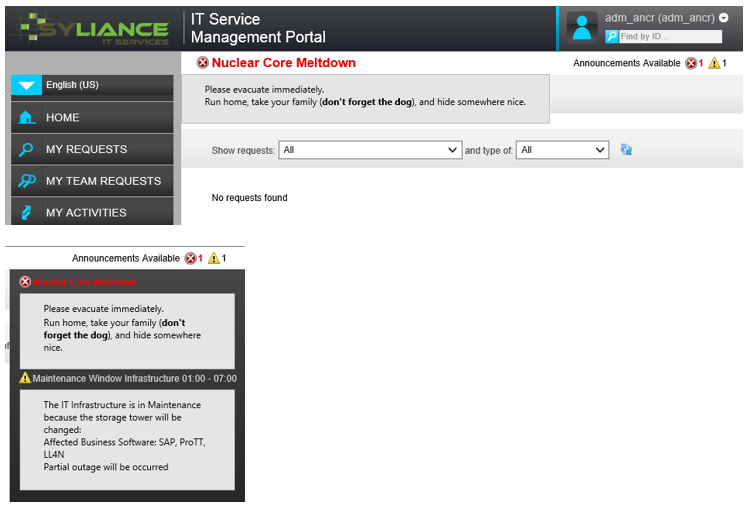
Announcements
Announcements are displayed on the portal. You can get more details of the Announcement by hovering the mouse over the Announcement itself or Announcements Available to display a fly out. Clicking on the link will pin the Announcement description to the page until you click again on the link.
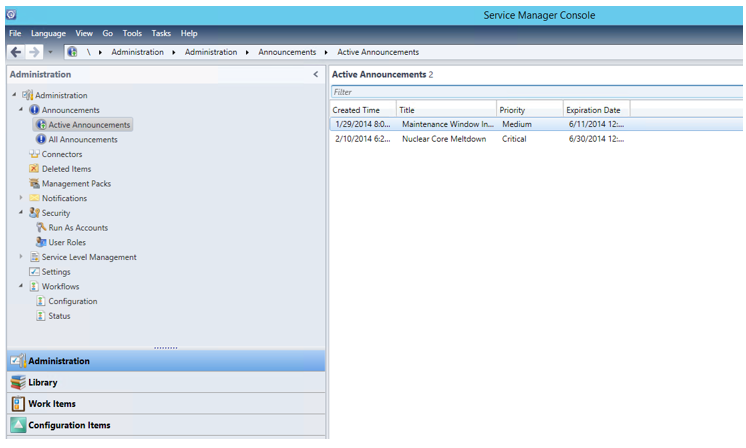
The Announcements are created in the Service Manager Console under Administration:
Sign Out
There is a Sign out option in the Logged on User pane so you can change user.

Working with Requests
Creating a Request
The detailed steps to create a new request of either an incident or service request type will depend on your administrator’s configuration of the service catalog.
Here are steps to create a new request:
- Click on the Service Catalog menu option or Create New Request button
- Click a Service Offering
- Review the details pane and select a Request Offering
- Clicking on the Request Offering displays the request offering details in the right-most pane
- Click on Create New Request at the bottom of the right-most pane of the Request Offering Details
- Fill in the required form details (this may require a combination of list picker options and free text typing). Click on Submit Request on completion.
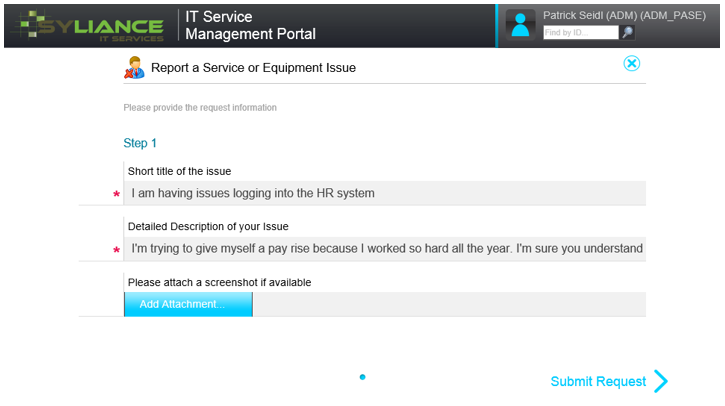
- You may encounter some of the new features of the ITSM Portal while filling in the request form like Repeating Tables and Conditional Questions.
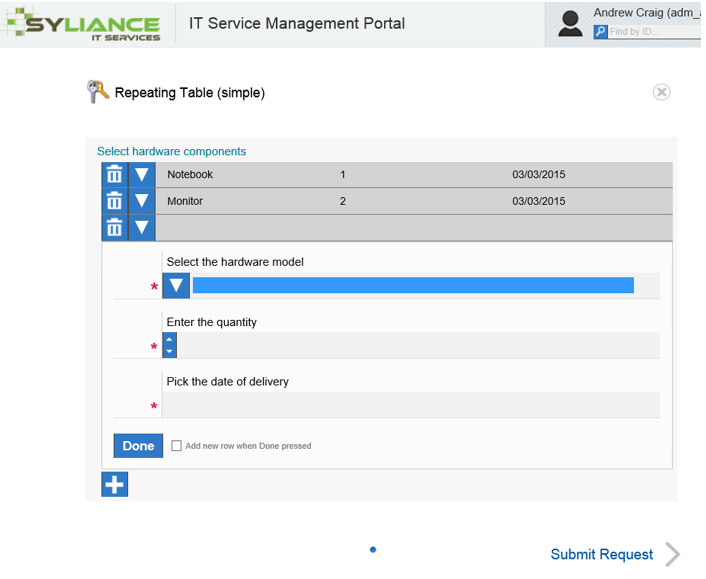
- Repeating Tables are sets of questions which can be used to answer multiple sets of the same questions, or enter line items like in an ordering form.
- The number of sets of questions that must be answered in a Repeating Table is determined in the configuration of the particular request and this cannot be altered in the ITSM Portal.
- Some Repeating Tables have only minimum recurrences, some have minimum and maximum recurrences. This means some Repeating Tables will not let the request be submitted until all required data has been entered and some will allow the user to decide when they have added enough line items whereas some again will only allow a certain amount of recurrences.
- When permitted, the user can add, edit or delete instances of the Repeating Tables in the form. The best analogy is the Basket and Checkout on an internet shopping site where you can add items, and later edit or remove as necessary.
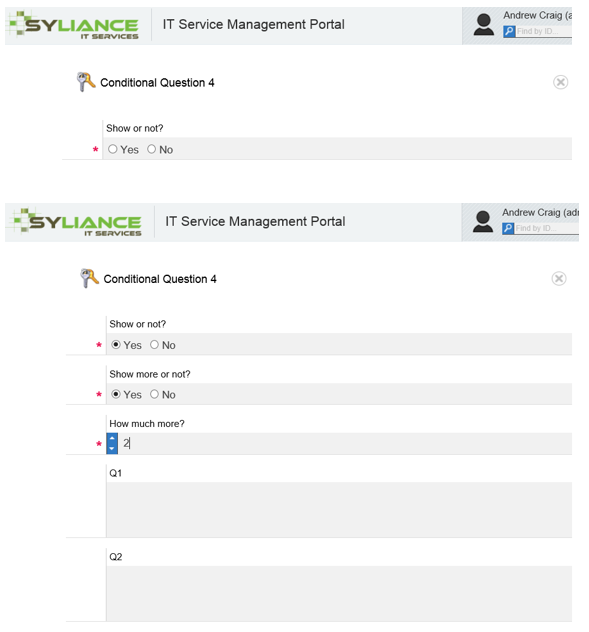
- Some questions have conditions assigned to them and only appear if previous questions are answered in a specific way or with specific answers. This could mean that a form appears to have only one question but once the information has been entered another question appears. The flow of questions in this way depends entirely on the complexity of the form as designed by the ITSM Portal administrator.
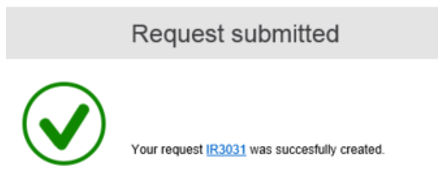
- You are presented with a request submitted notification message. Click on the link to review the status of the request, or click OK to return to the start page.
Working with existing Requests
You can add comments to, attach files to, or cancel a request that has been successfully submitted. Furthermore, you can apply a rating to resolved/completed requests.
Adding Comments and Attachments
You can add comments and attachments to open requests. This is useful if you want your IT department to have more information about an open request.
- Click the desired open request from the My Open Requests list on the start page of the portal, or use the My Requests section to find your request.
- Click Open Details… to load the details of the request
- Scroll down to the Comments area, and then click Add Comments and Attachments…
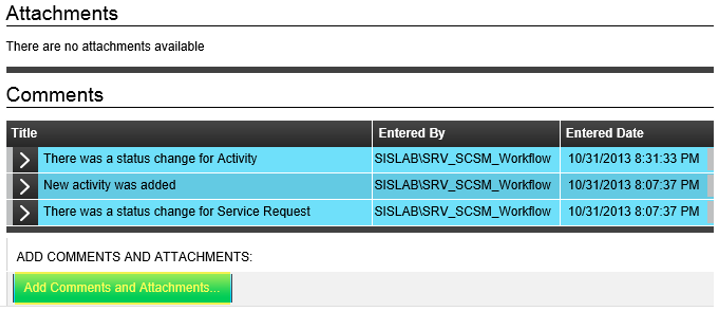
- Type a comment, and optionally add one or more attachments using the Add comments and attachments dialog that appears.
- Click OK to save the changes.
Cancel Requests
You can cancel an open request that is no longer relevant.
- Click the desired open request from the My Open Requests list on the start page of the portal, or use the My Requests section to find your request.
- Click Open Details… to load the details of the request
- Scroll down to the bottom of the page and click the Cancel Request button.

- Type a comment, and click OK to cancel the request. Clicking Cancel here will cancel the cancelation.
Rating closed requests (Customer Satisfaction)
You can rate closed requests to give feedback on how well, and if to your satisfaction, the request was resolved.
- Find and click on the desired request from the My Requests section.
- Click Open Details… to load the details of the request.
- Use the stars in the header of the request to rate.

- Optionally, type a comment in the dialog box that appears.
- Click OK to save your rating.
Activity Management
The ITSM Portal provides you with FOUR activity management functions, approvals (review activities),confirming status of task completion (manual activities), form filling activities and checklist activities.
Review Activities
Review activities are what an approver uses to confirm or deny authorization for a request. Here are the steps you must use to approve or deny a request using the ITSM Portal
- Click My Activities (or click the activity from the My Open Activities table on the start page of the portal).
- Filter activities requiring your approval by setting Show requests to Open Activities and type of to Review Activity
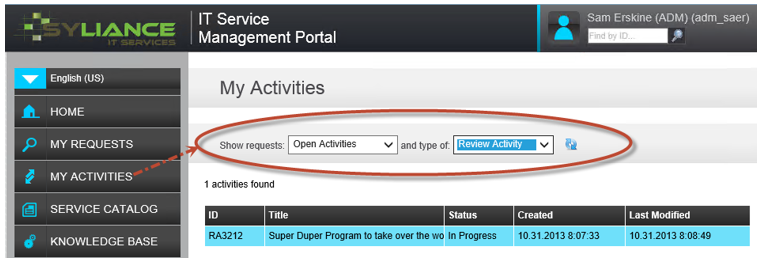
- Click on the Review Activity to approve or deny (reject) the request. You are able to view the list of approvers and also the approval condition.

- Optionally, click Open Details… if you need to review more information related to this activity or the work item associated to it.
- Click on either Approve or Reject, type a comment and click on OK to complete the action. Under the Reviewers section confirm the Decision (Approved or Rejected)
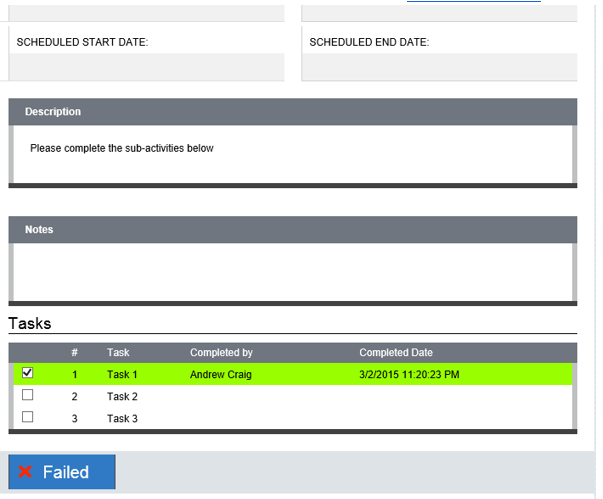
Completing Activities
Manual activities are what an analyst uses to confirm completion status of a task-based activity associated with a request. Here are the steps you must use to designate a task completion as successful or failed using the itnetX ITSM Portal.
- Click My Activities (or click the activity from the My Open Activities table on the start page of the portal).
- Filter activities requiring your approval by setting Show request to Open Activities and type of to Manual Activity.
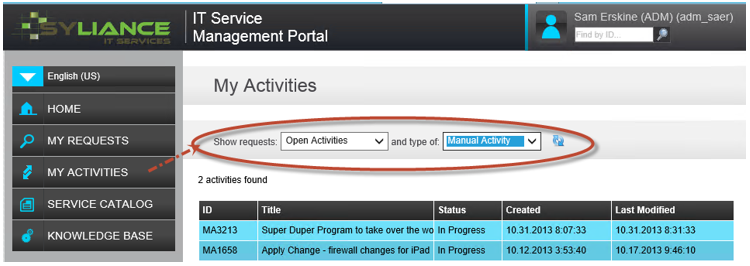
- Click on the Manual Activity to assign a status of success (completed) or failure (Failed) to the completion of an activity.
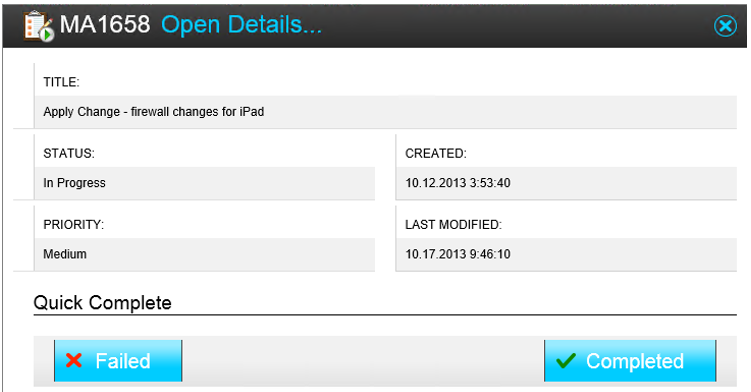
- Optionally, click Open Details… if you need to review more information related to this activity or the work item associated to it.
- Click on either Failed or Completed, type a comment and click on OK to complete the action.
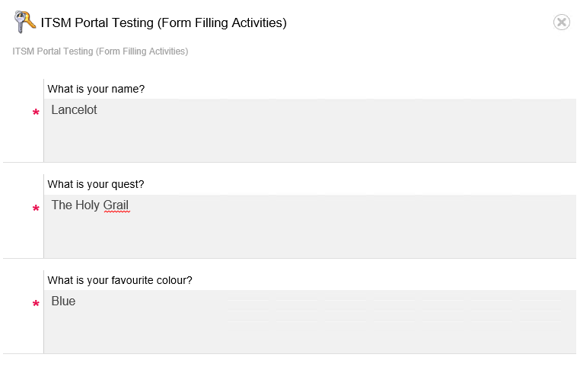
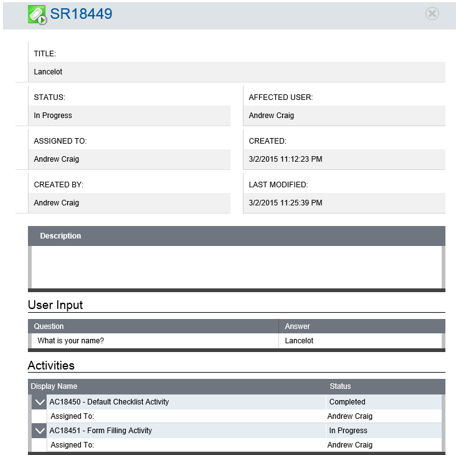
Form Filling Activities
When a Request Offering has a Form Filling Activity attached to it then it will appear on the ITSM Portal homepage in the activities pane. It will also appear on the My Activities page.
If the activity is assigned to you then you will see a pending activity and a button Fill Form.
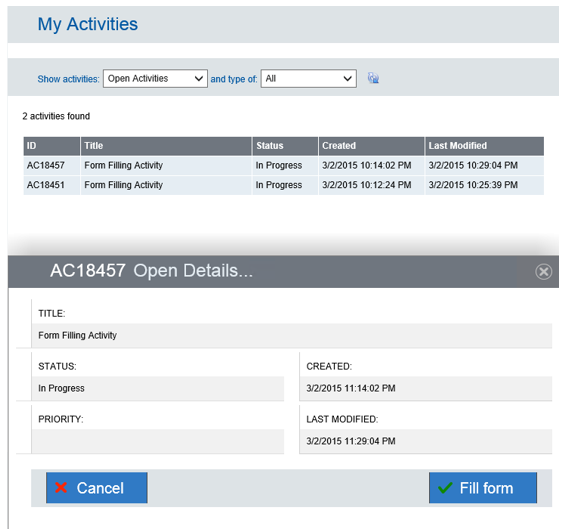
This may be where more information is required; once the information is entered click on Complete and the Request will be updated, submitted back to the server and the request process can continue.
Until this activity is completed the Request will not proceed but stay in a pending state. The affected user has visibility of who requests and activities have been assigned to, and their current status. Completed Activities showinthe Portal with Status Completed. This is also visible to the affected user.
Checklist Activities
When a Request Offering has a Form Filling Activity attached to it then it will appear on the ITSM Portal homepage in the activities pane. It will also appear on the My Activities page.

If the activity is assigned to you then you will see a pending activity and you can click on the activity to view details and the associated checklist, and check the boxes.
A comment dialogue box appears when a box is checked and the comments are saved with the Request. Once all the boxes are checked you must click on Complete before the Request will be updated, submitted back to the server and the request process can continue.
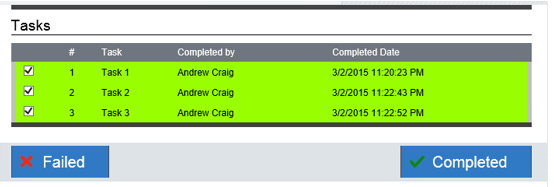
Until this activity is completed the Request will not proceed but stay in a pending state. The affected user has visibility of who requests and activities have been assigned to, and their current status.
Checklist Activities can also be completedin the SCSM Console, but Form Filling Activities can only be completed in the ITSM Portal.
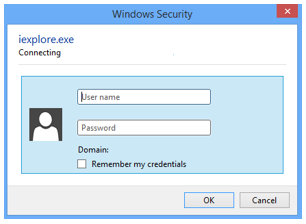
Forms Authentication
Without Forms Authentication the logon window looks like this:
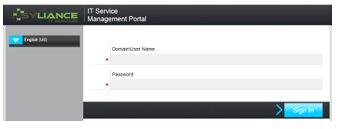
When Forms Authentication is enabled then the logon will look like this:
To enable Forms Authentication please see the Administration Guide.