Installation Guide
Requirements
It is recommended that you install itnetX ITSM Portal on a Service Manager management server.
Even for larger deployments where you require to deploy separate server(s) for ITSM Portal, it is
recommended to install the Service Manager management server role on the ITSM Portal servers.
This recommendation also applies if you are deploying ITSM Portal to a NLB cluster.
Installing itnetX ITSM Portal on a server that is not a SCSM management server is not recommended and requires additional configuration for Kerberos, delegation, and SPN records. Please contact support@itnetx.ch
Please make sure that you meet the following requirements:
- Server Hardware Requirements
- 4-core 2.66 GHz CPU
- 16GB RAM
- 250MB hard drive space
- Operating System Requirements
- Windows Server 2012 R2
- Windows Server 2016
- Service Manager Requirements
- System Center 2012 R2 Service Manager
- System Center 2016 Service Manager
- Browser Requirements
- Internet Explorer 10
- Internet Explorer 11
- Microsoft Edge
- Mozilla Firefox 42 and later
- Google Chrome 46 and later
Manual Installation
Please execute the following tasks on the portal server as an administrator:
- Make sure you are using the latest version of itnetX ITSM Portal. You can download it here: Download
- Install IIS with all required features by using the following command from an elevated PowerShell command prompt (Run as Administrator):
Add-WindowsFeature NET-Framework-45-Core,NET-Framework-45-ASPNET,Web-Server,Web-Http-Redirect,Web-Http-Tracing,Web-Log-Libraries,Web-Windows-Auth,Web-Net-Ext,Web-Asp-Net45,Web-Mgmt-Console
If you already have IIS installed, you should still execute the above script to ensure that any possibly missing components are added to the server - Make sure you have the .NET Framework 4.6.1 or later installed.
You can download an offline installer from the following URL: https://www.microsoft.com/en-us/download/details.aspx?id=53344
On Windows Server 2016, .NET Framework 4.6 is already included. - Download and install the Microsoft Visual C++ 2015 Redistributable:
https://go.microsoft.com/fwlink/?LinkID=615460 - Download and install the .Net Core Windows Server Hosting bundle:
https://dotnet.microsoft.com/download/dotnet-core/thank-you/runtime-aspnetcore-1.1.13-windows-hosting-bundle-installer - Restart IIS by using the following command from an elevated command prompt:
iisreset - Download the latest version of itnetX Advanced View Editor from the following URL and unzip it to a temporary location on the portal server:
http://www.itnetx.ch/wp-content/uploads/software/AdvancedViewEditor-5bab34c2-7941-9d3f-cc6e-50f1b5864d74.zip - Download the latest version of itnetX Checklist Activity from the following URL and unzip it to a temporary location on the portal server:
http://www.itnetx.ch/wp-content/uploads/software/ChecklistActivity-2e1bcfdb-3abe-45ea-ad88-5f4aeb740592.zip - Download and install the SMLets:
https://github.com/Microsoft/smlets - Read the Release Notes
Before you begin
Please read the following chapters carefully if you are already using either itnetX ITSM Portal v2 or itnetX Advanced View Editor.
Upgrading from a previous version of itnetX ITSM Portal
IMPORTANT
Previous versions of itnetX ITSM Portal stored custom Request Offering settings in your management packs. Due to a bug introduced in Service Manager 2016, these settings can no longer be stored in management packs, but must be stored in your CMDB instead.
If you are currently using itnetX ITSM Portal version 2.0.4.5 or older, changes you make to your Request Offerings will only be available in the new Portal v3 after the upgrade.
You can check the version of your ITSM Portal by checking the version of the itnetX ITSM Portal Supporting Library management pack.
You must migrate your request offerings from the management pack to the CMDB after the installation of ITSM Portal v3. A script is provided for this task and is explained in Migrating your Request Offerings
If you want both the old v2.x and the new v3 portal to work simultaneously, you first have to upgrade itnetX ITSM Portal v2 to version 2.1.x.x, and then install ITSM Portal v3 as a separate web site. This will allow you to use both portals at the same time.
Upgrading from a previous version of itnetX Advanced View Editor
You must upgrade to itnetX Advanced View Editor 3.x for ITSM Portal v3 to work. If you are currently using a version older than 2.0.1561.79, or if you are using any version of SCSMSolutions Advanced View Editor, then you must update your views after the upgrade. Please read the itnetX Advanced View Editor for SCSM - Release Notes for more information on upgrading to the latest version. This document can be found in the ZIP file you downloaded in step 7 of the previous chapter.
New Installation
Please perform the following tasks as an SCSM Administrator to install itnetX ITSM Portal v3:
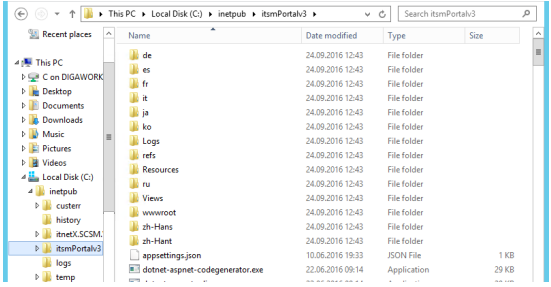
- Create a subdirectory named itsmPortalv3 in the C:\inetpub folder
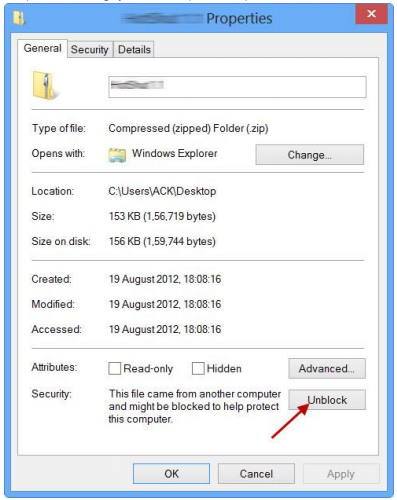
- Unblock the \Portal\ITSMPortal_v3_Installer.zip. If this option is not available in the File Properties dialog, you can skip this step.
- Extract the content of \Portal\ITSMPortal_v3_Installer.zip to the folder created in step 1.
- Open Internet Information Services (IIS) Manager
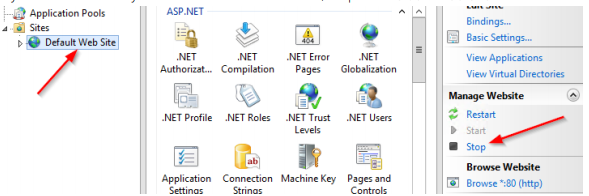
- If you do not host any other websites on this server, stop the Default Web Site
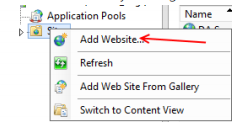
- Create a new site by clicking on Add Website…
- Enter itsmPortalv3 as the site name and choose the folder from step 1 as the physical path.
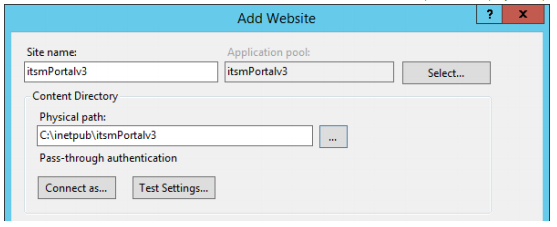
Choose appropriate binding options so as to not run into a conflict with an already existing website. If this is the only website you intend to be hosting on this server, the easiest way to configure binding is to use http as the Type, All Unassigned as the IP address, and 80 as the Port. Under Host name, you can enter a custom DNS name for your website (if you have one). If you want to use https, you must have a SSL certificate available on the web server.
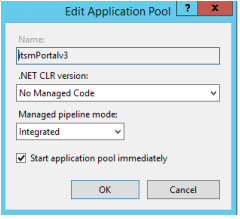
If you see a message about duplicate binding, click Yes - Navigate to Application Pools, select the pool of your newly created site and open the Basic Settings
- Change the .Net CLR Version to No Managed Code
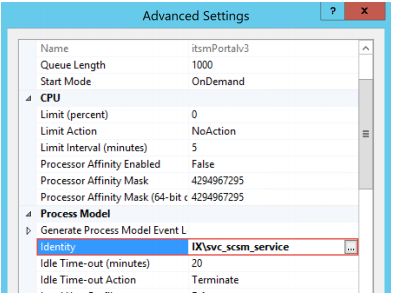
- Open the Advanced Settings of the Application Pool and change the Identity to the SCSM Service Account by selecting Custom account and entering the user name in the format [Domain]\[User Name] and the password.
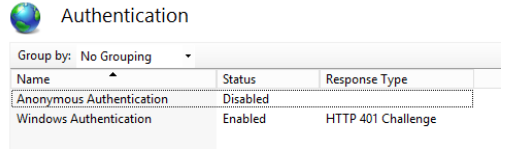
- Navigate to Sites, select the newly created site itsmPortalv3, double-click Authentication and make sure that Anonymous Authentication is Disabled and Windows Authentication is Enabled
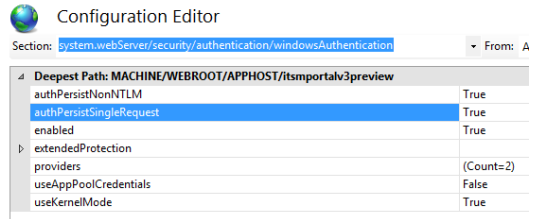
- Navigate to Sites, select the newly created site itsmPortalv3, double-click Configuration Editor
and select the Section “system.webServer/security/authentication/windowsAuthentication”. In
this configuration, set authPersistSingleRequest to true
- Import the following management packs in given order into your SCSM environment. You can
either find them in the files you downloaded or in the \MP directory of the ITSM Portal
installation media:
- itnetX.AdvancedViewEditor.2012.mpb (for SCSM 2012)
- itnetX.AdvancedViewEditor.2016.mpb (for SCSM 2016)
- itnetX.ChecklistActivity.2012.mpb (for SCSM 2012)
- itnetX.ChecklistActivity.2016.mpb (for SCSM 2016)
- The licensing library
- Your license management pack
- itnetX.ITSMPortal.SupportingObjects.2012.mpb (for SCSM 2012)
- itnetX.ITSMPortal.SupportingObjects.2016.mpb (for SCSM 2016)
- itnetX.ITSMPortal.Analyst.mpb
- Syliance.ITSMPortalSupporting.Objects.xml
- itnetX.ITSMPortal.Analyst.Configuration.xml
- itnetX.ITSMPortal.EndUser.Configuration.xml
- itnetX.ITSMPortalSupporting.Groups.xml
- itnetX.ITSMPortalSupporting.TasksConfig.xml
- if you are using the itnetX Productivity Pack, import itnetX.ITSMPortal.Analyst.ProductivityPack.xml - Restart the SCSM Console
- Change the permissions for the folder C:\inetpub\itsmPortalv3\Logs to write, read and modify for Everyone
- Change the permissions for the folder C:\inetpub\itsmPortalv3\wwwroot\App_Data\upload to write, read and modify for Everyone
- Browse to the URL and start using the itnetX ITSM Portal. Please refer to the Administration Guide for information about configuring and using the portal
Migrating your Request Offerings
In case you are or were using a previous version of ITSM Portal (version 2.0.4.5 or older), you must migrate your Request Offerings for them to work with ITSM Portal v3.
- Run PowerShell as an Administrator
- Execute the Migrate-itnetXPortalExtensions.ps1 script from the \Docs directory of the portal
If you are adding more request offerings created with ITSM Portal v1 or v2 by importing management packs at a later stage, please run this script again.
Removing and unregistering Request Offering Extensions from Management Packs
Once you have migrated the request offerings, please verify that the request offerings work as expected in the portal. Then, you can remove the request offering extensions from the management packs by executing the Remove-itnetXMPExtensions.ps1 script following from the \Docs directory of the portal v3.
After you have removed the Request Offering Extensions from the management packs, you should unregister the management pack extension of the old ITSM Portal. To do so, you must execute the following script as an administrator: \SylianceITSMPortal\bin\unregisterExtension.ps1
These two scripts will only work when you run them from a server with ITSM Portal version 2.0.4.5 or older installed. Please verify the path to the Syliance.ITSMPortal.Shared.dll file in the scripts before you run them.
Upgrading an existing installation
If you have already installed an earlier version of the ITSM Portal v3, please follow these steps to update your installation:
Customizations
Your customizations of ITSM Portal will remain untouched in case you have followed the recommendations of the Admin Guide.
Custom themes will remain untouched by the upgrade. If you have done modifications to the CSS files, you must manually merge your changes with the new CSS files shipped with the base theme. If you have only modified the LESS files, you will need to recompile them.
Custom forms will remain untouched by the upgrade. It could be that the new version of the portal will bring changes to the out-of-the-box forms. If you have altered these forms, it is recommended that you manually merge your changes with the cshtml files shipped with the new version.
Should you have altered the out-of-the-box source files, your customizations will be overwritten.
Updating Unsealed Management Packs
Depending on what type of customizations you already performed in the portal, you will have to merge your changes with the latest version of the management pack. Please read through and follow the instructions in the following two chapters if applicable.
Upgrading the Analyst Configuration management pack
Have you already published or unpublished any views in the Analyst Portal? If you have not done any changes to the published views, or if you are okay to revert to the standard and re-publish your views manually (recommended), then please import the itnetX.ITSMPortal.Analyst.Configuration.xml management pack into your environment.
If you have changed the publication of views in the Analyst Portal, and you want to keep your changes, you must merge your changes with the latest version of the management pack:
- Copy the \MP\itnetX.ITSMPortal.Analyst.Configuration.xml file which ships with the ITSM Portal installer to a temporary directory on a SCSM management server
- Run the script Upgrade-itnetXAnalystMP.ps1 found in the Docs folder in the \Portal\ITSMPortal_v3_Installer.zip archive.
- Provide the full path to the file itnetX.ITSMPortal.Analyst.Configuration.xml from the first step.
- When the script is finished, import the itnetX.ITSMPortal.Analyst.Configuration.xml from the location of the first step.
Upgrading the End User Configuration management pack
Have you already changed the views that appear in the End User portal home page, the Requests section, or the Activities section, or have you added any custom views or sections? If you have not done any changes to the views, or if you are okay to revert to the standard (recommended), then please import the itnetX.ITSMPortal.EndUser.Configuration.xml management pack into your environment.
If you have changed views or folders in the End User Portal, and you want to keep your changes, you have to merge your changes with the latest version of the management pack:
- Copy the \MP\itnetX.ITSMPortal.EndUser.Configuration.xml file which ships with the ITSM Portal installer to a temporary directory on a SCSM management server
- Run the script Upgrade-itnetXEndUserMP.ps1 found in the Docs folder in the \Portal\ITSMPortal_v3_Installer.zip archive.
- Provide the full path to the file itnetX.ITSMPortal.EndUser.Configuration.xml from the first step.
- When the script is finished, import the itnetX.ITSMPortal.EndUser.Configuration.xml from the location of the first step
Updating the Portal
- Try to import all of the following management packs in given order. Management Packs which do not have a newer version than the one you have currently installed can be skipped.
a. itnetX.AdvancedViewEditor.2012.mpb (for SCSM 2012)
b. itnetX.AdvancedViewEditor.2016.mpb (for SCSM 2016)
c. itnetX.ChecklistActivity.2012.mpb (for SCSM 2012)
d. itnetX.ChecklistActivity.2016.mpb (for SCSM 2016)
e. itnetX.ITSMPortal.SupportingObjects.2012.mpb (for SCSM 2012)
f. itnetX.ITSMPortal.SupportingObjects.2016.mpb (for SCSM 2016)
g. itnetX.ITSMPortal.Analyst.mpb
h. Syliance.ITSMPortalSupporting.Objects.xml
i. itnetX.ITSMPortalSupporting.Groups.xml
j. itnetX.ITSMPortalSupporting.TasksConfig.xml
k. if you are using the itnetX Productivity Pack, import itnetX.ITSMPortal.Analyst.ProductivityPack.xml - If you are upgrading from a BETA version, import all management packs listed under step 12 in the previous chapter. Also, make sure you try to import already existing management packs, as the version might have changed. You also need to re-import the unsealed management packs for the portal to work
- Stop IIS by executing
net stop w3svcfrom an elevated command prompt. - Create a backup of the C:\inetpub\itsmPortalv3 directory
- IMPORTANT: Delete the refs folder located in C:\inetpub\itsmPortalv3 and all of its content
- Unblock the \Portal\ITSMPortal_v3_Installer.zip and extract the content to a temporary directory.
- Remove the following files from the temporary directory:
a. \appsettings.json
b. \web.config
c. \wwwroot\Settings\AnalystForms.json
d. \wwwroot\Settings\ConsoleTasksPermissions.json
e. \wwwroot\Settings\EndUserForms.json - Copy all files to the C:\inetpub\itsmPortalv3 directory, overwriting already existing files with the new ones.
- Restart IIS by executing
iisresetfrom an elevated command prompt. - In your browser, go to the portal, then clear the cache by pressing Ctrl-F5
Post-Upgrade Tasks
Upgrading from any version
Follow these steps after each upgrade from any version of ITSM Portal v3:
- CSS files could have changed. If you have done modifications to the CSS files, you must manually merge your changes with the new CSS files shipped with the base theme. If you have only modified the LESS files, you will need to recompile them
- Forms (cshtml) files could have changed. If you have altered out-of-the-box forms, it is recommended that you manually merge your changes with the cshtml files shipped with the new version.
Upgrading from a version older than v3.2
Follow these steps if you are upgrading from a version older than v3.2.
Analyst Portal Forms
You must manually add the following forms to the portal, following the instructions found in chapter 5.1, steps 5-6, of the Administration Guide.
Knowledge Article
Target Class: System.Knowledge.Article
Type Projection: itnetX.ITSMPortal.Analyst.KnowledgeArticle.Projection
Default Form: CI_KBArticle\CI_KBArticle_DefaultForm
Checklist Task
Target Class: Syliance.ChecklistTask
Type Projection: Syliance.ChecklistTask.ProjectionType
Default Form: WI_ChecklistActivity\WI_ChecklistActivityTask_DefaultForm
Custom Theme
If you have a custom theme and you modified the CSS file, you have to minify the CSS file and rename it to styles.min.css. If you don’t know what minification means, or if you cannot do it, you can simply rename the file styles.css to styles.min.css.
Custom layout
If you have customized one of the following views, you will need to merge your version with the original file. If you forget to do this, the portal will not function properly.
- Areas\Analyst\Views\Shared\_LayoutAnalyst.cshtml
- Areas\EndUser\Views\Shared\_LayoutEndUser.cshtml
Licensing
Your license is delivered in the form of two management packs:
- The licensing library: itnetX.SCSM.Licensing.Library.mpb
- The actual license:
- itnetX.SCSM.ITSMPortalAnalystv3.LicenseInfo.mp if you own the Analyst Portal
- itnetX.SCSM.ITSMPortalEndUserv3.LicenseInfo.mp if you own the End User Portal
- itnetX.SCSM.ITSMPortalSuitev3.LicenseInfo.mp if you own the ITSM Portal Suite
You must import the licensing library management pack and one of the license management packs for the portal to work. If you are upgrading from a trial to a production license, you need to first delete the old license management pack, and then import the new one. You do not need to replace the licensing library management pack.
Free Edition
The End User Portal is also available as a free edition with reduced functionality If you do not install a license management pack, or if your license is invalid or expired, the end user portal will run in Free Edition. The Analyst Portal will not work without a license.
Remove Console Tasks management pack
If you have previously imported the itnetX.ITSMPortalSupporting.TasksConfig.xml management pack, you must remove it again from SCSM, otherwise you will not be able to create and edit request offerings that work with the free edition of the End User Portal. The display name of the management pack as displayed in the SCSM Console is itnetX ITSM Portal Console Tasks Configuration.