User Guide
Introduction
Power Print for SCSM lets you configure printouts and PDF exports for work items and configuration items in a very easy way. The extension allows you to bring object values to the printout and helps you to create handover documents by using Service Manager notification templates. Main Features
- Easy-to-configure printouts for CMDB objects
- Create handover documents
- Simple configuration with notification templates
- Use placeholders to add object property values
- Export to printer, PDF or HTML
Installation
Installation
The installation is performed using the management pack import functionality of SCSM. Please refer to the Microsoft TechNet Library for more information on how to import management packs:
http://technet.microsoft.com/en-us/library/hh524269.aspx
Follow these steps to install Operaio Power Print for SCSM:
- Log on to SCSM using an account with administrative privileges in SCSM.
- For SCSM 2012, import the itnetX.PowerPrint.2012.mpb management pack.
For SCSM 2016, import the itnetX.PowerPrint.2016.mpb management pack. - Import the itnetX.SCSM.Licensing.Library.mpb Management Pack into your SCSM environment.
- Import the itnetX.SCSM.PowerPrintv1.LicenseInfo.mp or the itnetX.SCSM.scsmProdPackv1.LicenseInfo.mp (bundle license for Productivity Pack) Management Pack into your SCSM environment.
- Restart the SCSM Console.
Using Power Print from a server
When you use Power Print from a console running on a server operating system, layout issues with the printout can occur. We recommend you use Power Print from your client computers only. Running Power Print from a server operating system is not supported.
Using Power Print in the Operaio ITSM Analyst Portal
You can use Power Print with the Operaio ITSM Analyst Portal.
To install Power Print for the Operaio ITSM Analyst Portal:
- Copy the content of the Portal folder found in the Power Print installation archive to the root directory of the ITSM Portal website.
- Restart the ITSM Portal website
- Clear the browser cache by reloading the ITSM Portal with Ctrl-F5
Using Power Print in the itnetX ITSM Analyst Portal
Power Print version 1.0.x.6 requires the ITSM Analyst Portal version 3.7.13 or later.
How it works
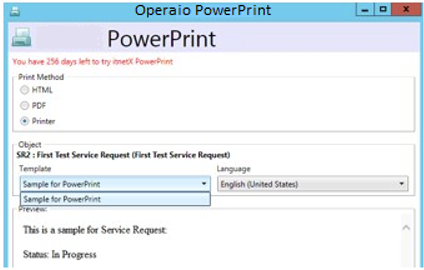
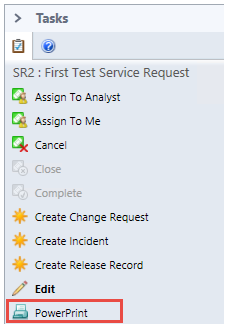
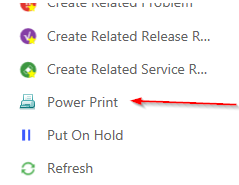
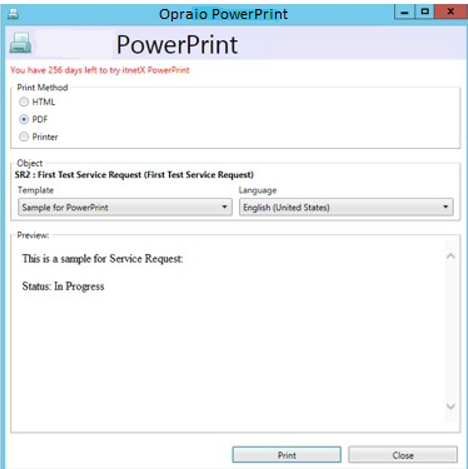
Operaio PowerPrint for SCSM is exposed as a Console Task.
When you click on the PowerPrint Task in the user interface the Power Print form opens. The Power Print task is available in the console task pane and on the Work and Config Item forms.
| SCSM Console: | Analyst Portal: |
|---|---|
 |
 |
On the Power Print form you can select the Print Method you want to use. You can choose between HTML, PDF or Printer.
In the Object section you can specify the template to be used. This is described in Print Template. You can also define the language to be used. All languages available in the notification template are listed in the dropdown box. By default, the operator’s UI language (if available) is used. In the Preview section you can check the print output.
By clicking on Print the printout will be generated via the selected print method.
Configuration
Operaio Power Print for SCSM is ready to use after the installation completes, however you can configure additional options
Console Tasks
You can show/hide the console task for certain users by using SCSM user roles.
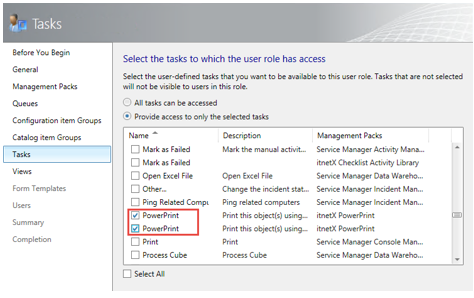
You can two instances of the Power Print Task. This is because the task exists for Work Items and for Configuration Items. You need to check both.
Print Template
Power Print leverages the notification templates of SCSM. You can find all templates under Administration – Notifications – Templates. Here you have the possibility to view existing templates and to create new custom templates, which can be used for Power Print. Out-of-the-box there are already some templates for the Incident class available.
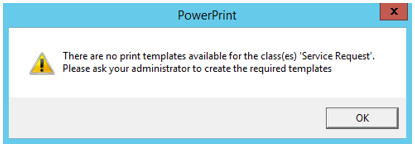
Please note, that a template is always targeted to a class (for example Incident, or Windows Computer) and can only be used for this class. If there are no Power Print templates available for a class, you will see the following message:
To create a new template, follow the steps below:
- Navigate to Administration – Notifications – Templates and select Create E-Mail Template from the task pane.
- Enter a name and optionally a description
- Specify the target class, for which the template should be use (for example Service Request)
- Specify a Management Pack to save this custom template in
- In the Template Design tab, you can configure your custom template. You have the possibility to use HTML code to design your template, if so make sure that the checkbox Send as HTML is checked. Please note: The Message subject is a required field and must be filled out for the template creation, but will be ignored by Power Print.
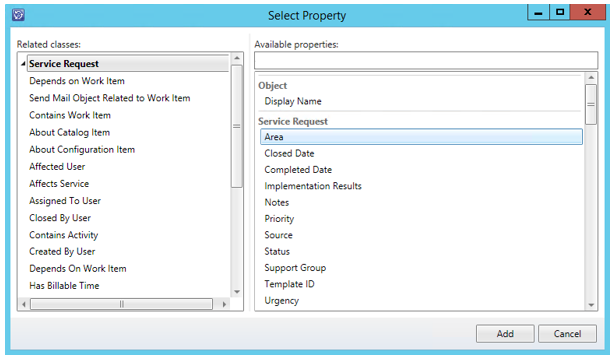
- With the Insert button you can add properties from the selected target class. In our case from Service Request:
- When finished you can review the configuration summary and create the template.
- When we go back to Work Items -> Service Requests you can click the Power Print task in the task pane or in the Service Request form and the custom created template is now available: